This is one of the older builds in my display case, Hasegawa’s G4M1 Betty which was first released in 1969. I would have built this in the late 1970’s when I was on a major Japanese aviation kick. This is an old tool of the early version of the Betty. It features fine raised rivet detail throughout. It has been continuously reboxed with different markings ever since its first release. Mine was packaged with an Ohka flying bomb although this was only carried by later versions of the Betty.
After the surrender of Japan on 15AUG45 General Douglas MacArthur directed the Japanese to send a delegation to meet with him in Manila to make arrangements for the formal surrender ceremony and occupation. The delegation was to fly first to Ie Shima where they would board an American C-54 Skymaster for the flight to Manila. To avoid any confusion, the Japanese were given specific directions on how to mark their aircraft – they were to be painted white overall with green crosses in eight locations. The American provided escorts of B-25 Mitchells from the 345th Bomb Group and top cover was flown by a dozen P-38 Lightnings of the 80th Fighter Squadron.
The Japanese delegation used two aircraft, a G6M1-L (transport variant) using the call sign “Bataan 1” and a G4M1 call sign “Bataan 2”. These photographs show the Bettys’ arrival on Ie Shima on 17AUG45, which were the object of great curiosity and drew a large crowd. After the meeting, the Japanese were flown back to Ie Shima on 20AUG45. The return flight to Japan was eventful for both aircraft. Bataan 2 slipped off the runway and required repairs, the crew dining with the Americans in the base chow hall. Bataan 1 developed a fuel leak on the return trip and was forced to ditch on a beach on Honshu, the Japanese delegation survived and waded ashore to complete their journey.
For modelers, these photographs display several interesting details. The white paint was applied in a thin layer by spray gun, close examination reveals the spray pattern and weak areas in the paint coverage. There is evidence of larger green crosses under some of the final markings. Already oil leakage can be seen under the engine nacelles.
This is Hasegawa’s Mitsubishi G4M2 Type 1 Land Based Attack Bomber Model 22, Allied reporting name “Betty”. It is marked as a machine of the 708 Hikotai of the 762 Kokutai. This unit was decimated in the Philippines in 1944. Insignia are painted using Maketar masks, the tail codes are from the kit and were well behaved. I also used a canopy mask set which is very helpful with the greenhouse canopies. You can see into the cockpit area through the canopy and to a lesser extent into the nose and tail positions. It wouldn’t be a total waste to detail these areas although not an absolute requirement either. The most useful reference I found was the Revi volume, very thorough with a separate plan sheet in 1/72 scale and color side profiles. My subject is from one of the profiles in that book.
This model represents the F4F-3a of LT Butch O’Hare of VF-2, “White 15”, BuNo 4031. This is the aircraft O’Hare flew on 20 February 1942 while defending the USS Lexington (CV-2) from Japanese bombers. He and his wingman were the only two Wildcats in position to defend Lexington from an attack by nine G4M “Betty” bombers of the 4th Kokutai, but the wingman’s guns jammed and would not fire. Undeterred, O’Hare made four deflection passes through the Japanese formation. He shot down three Bettys and damaged four others. One of the damaged Bettys (carrying the flight leader, LCDR Takuzo Ito) attempted to crash into Lexington but missed, another ditched on the return flight. O’Hare was credited with destroying five aircraft to become the Navy’s first ace, and was awarded the Congressional Medal of Honor for his actions.
Markings are from Mark’s Starfighter Decals sheet 72-142 USN Hit & Run Raids Feb-Apr 1942. All behaved flawlessly. The model got the Quickboost resin -3 wings, and the scoop on the top of the cowl was filled with superglue and sanded smooth. The True Details cockpit and wheelwell set was also used.
The USS Ward (DD-139) was a Wickes-class destroyer, one of 273 “flush deck” or “four-piper” destroyers built for the United States Navy in WWI. She was constructed in record time using a construction technique which would later be called “pre-fabrication”. Her keel was laid on 15MAY18 and she was launched on 01JUN18 – a mere 17 1/2 days.
Here is Ward alongside at the Mare Island Shipyard. Ward was commissioned into the US Navy on 24JUL18. During her sea trials she made an impressive 37 1/2 knots.
A nice view of Ward underway in her WWI dazzle camouflage. If you look closely you can make out her hull number 139 painted under the bridgewing at the deck line. (Naval History and Heritage Command Photograph)
A good view of the port side showing the WWI camouflage pattern. Wickes class destroyers were armed with four 4″/50 guns, twelve torpedo tubes, and depth charges for anti-submarine work. Note that the after 4″ gun is mounted on the main deck, later this gun was moved to the top of the after deckhouse. Ward was decommissioned and place into reserve on 21JUL21, and recommissioned out of reserve on 13FEB41.
The USS Ward is most famous for firing the first shot of the US involvement in the Second World War. Ward was patrolling the approaches to Pearl Harbor when she received a report from the USS Condor (AMC-14) that a periscope had been sighted in the area. Ward found the submarine attempting to follow the USS Antares (AKS-3) into the harbor. The submarine was a Japanese “Target A” mini sub, one of five launched as part of the Pearl Harbor attack. Ward engaged the submarine and claimed it as destroyed. Her Commanding Officer, LT William W. Outerbridge reported, “We have attacked, fired upon, and dropped depth charges upon submarine operating in defensive sea area.” This was 70 minutes before the first Japanese aircraft arrived over Hawaii. (Painting by Tom Freeman)
A publicity photograph of Ward’s No. 3 gun crew. The first shot from No. 1 gun missed but the second shot from No. 3, fired at minimum range, was seen to hit the submarine’s sail. Most of the crew of the Ward were reservists from Minneapolis, Minnesota. Ward’s No. 3 gun is preserved today in the courtyard at Minnesota’s state capitol building in St. Paul. (US Navy Photograph)
Some skeptics doubted the Ward’s claim. Those doubts were put to rest on 28AUG02 when researchers from the Hawaii Undersea Research Laboratory discovered the Japanese mini sub on the seafloor within four miles of the entrance to Pearl Harbor in 1,200 feet of water. The hole made by Ward’s 4″ projectile is clearly visible at the center of the base of the sail – a perfect shot.
The “four pipers” were obsolete as fleet destroyers by the standards of WWII and many were converted to other roles such as seaplane tenders, convoy escorts, minelayers, minesweepers, or fast transports. Ward was one of 32 flush deckers converted to the fast transport role and was reclassified as APD-16 in FEB43. In this new configuration she could land 120 troops along with small vehicles using four LCP(R) landing craft. The 4″/50 guns were replaced by 3″/50 dual-purpose guns and augmented with five 20mm cannon. Ward lost her torpedo tubes but retained her depth charges which allowed her to still function as an escort.
Ward participated in frequent landing operations both large and small during the better part of 1943/44. Typically the APDs would land their troops and then provide anti-aircraft and anti-submarine protection of the landing area, and be on-call for Naval Gunfire Support of the troops ashore. They were also useful for hauling and landing supplies.
On 07DEC44 – exactly three years after the Pearl Harbor raid, Ward landed 108 Army troops at Ormoc Bay, Philippines and was providing ASW screening of the landing area when she was attacked by three Mitsubishi G4M “Betty” bombers. Two attempted kamikaze runs but missed, the third struck Ward squarely amidships on the Port side. (Naval History and Heritage Command Photograph)
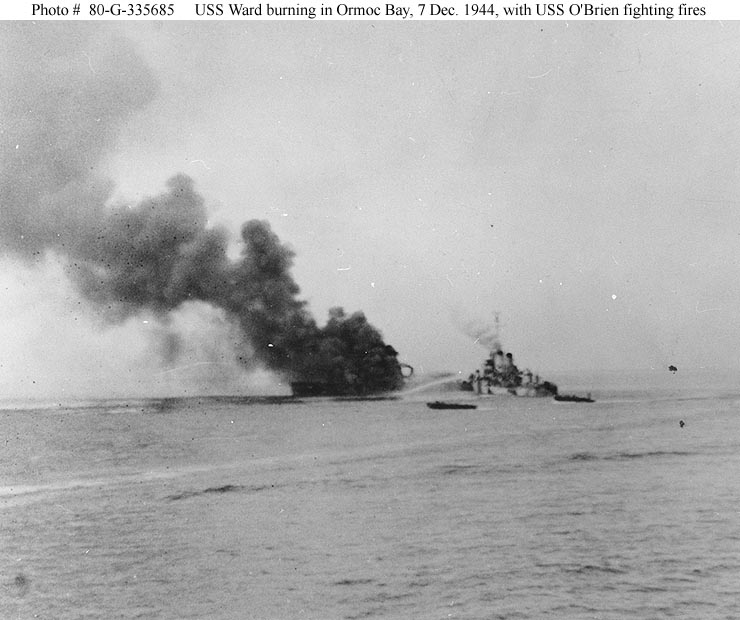
Ward lost power and was unable to control her fires. Here the destroyer USS O’Brien (DD 725) moves in to assist the stricken Ward. (US Navy Photograph)
O’Brien is alongside with her firehoses at work. Even with her assistance it was clear that the fires were uncontrollable and the Ward was doomed. Less than half an hour after the kamikaze hit her Captain, LT Richard E. Farwell, ordered abandon ship. O’Brien and other vessels took aboard Ward’s crew, then O’Brien moved off 800 yards to sink Ward with gunfire. Her first salvo detonated Ward’s after magazine. When the smoke cleared, Ward was slipping beneath the surface stern first.
In a strange twist of fate, the Captain of the O’Brien that day was William W. Outerbridge, now a Commander. He was the Captain of the USS Ward during the attack on Pearl Harbor, and commanded the destroyer which sank her exactly three years to the day later. O’Brien was later hit by a kamikaze herself off Okinawa and was damaged. Outerbridge survived the war, among his decorations was a Navy Cross for Ward’s actions off Pearl Harbor, and a Purple Heart earned at Okinawa. (US Navy Photograph)
WHENEVER ANY FORM OF GOVERNMENT BECOMES DESTRUCTIVE OF THESE ENDS (LIFE,LIBERTY,AND THE PURSUIT OF HAPPINESS) IT IS THE RIGHT OF THE PEOPLE TO ALTER OR ABOLISH IT, AND TO INSTITUTE A NEW GOVERNMENT― Thomas Jefferson