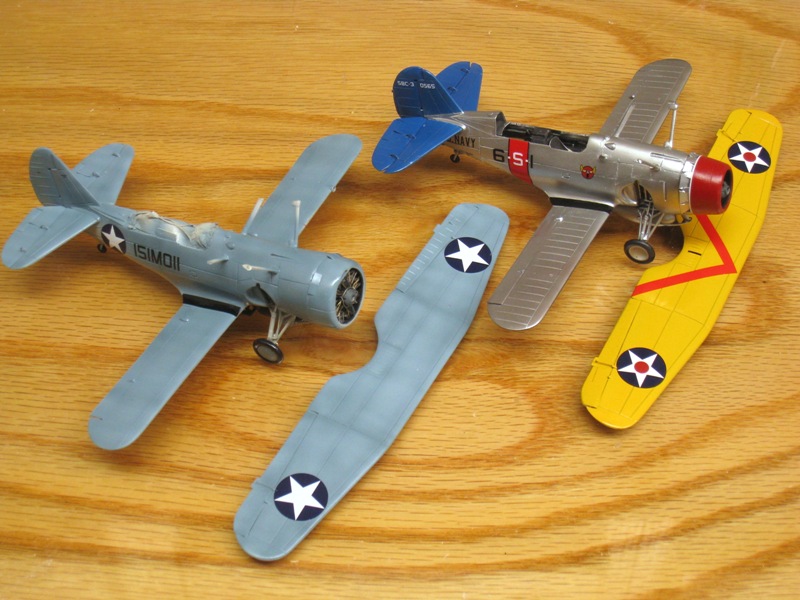
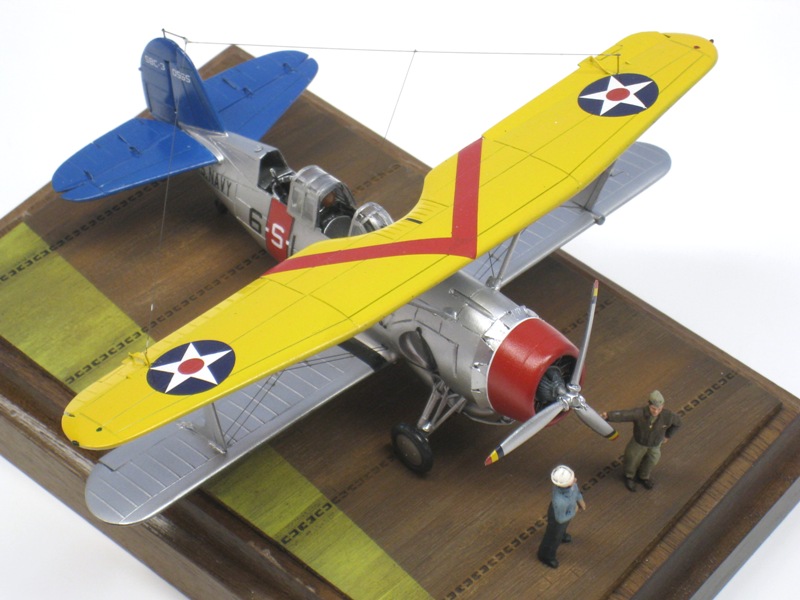
This is another construction thread originally posted on the 72nd Scale Aircraft forum in 2011. The original posts were wrecked by Photobucket, what is posted here is a back-up of the original material. The build is a kitbash of two SBC Helldivers. One is a -3 in “Yellow Wings” markings, the other a camouflaged example from VMO-151, a Marine unit which flew the SBC-4 from Samoa until mid-1943 (!!!)
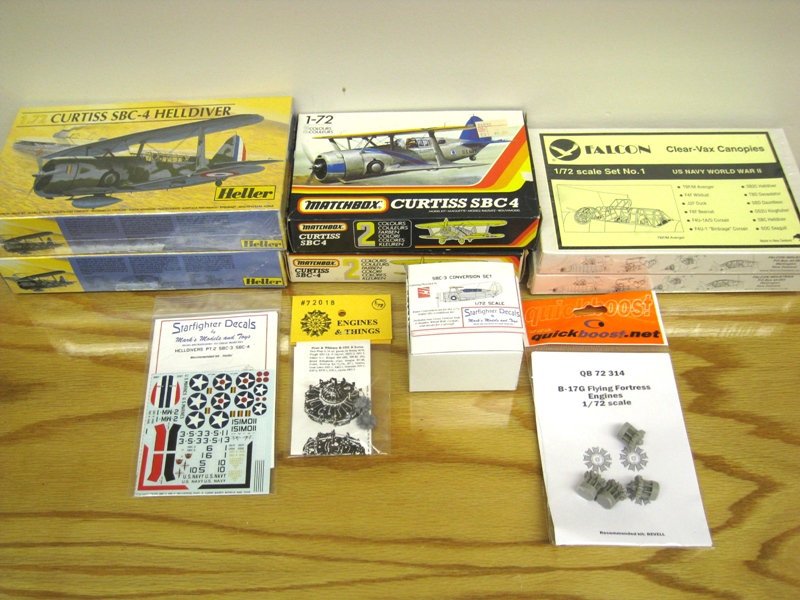
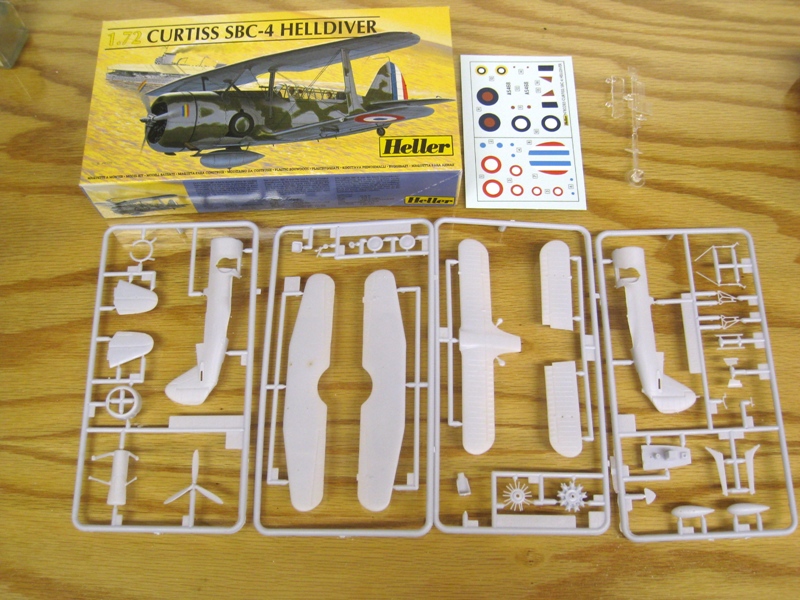
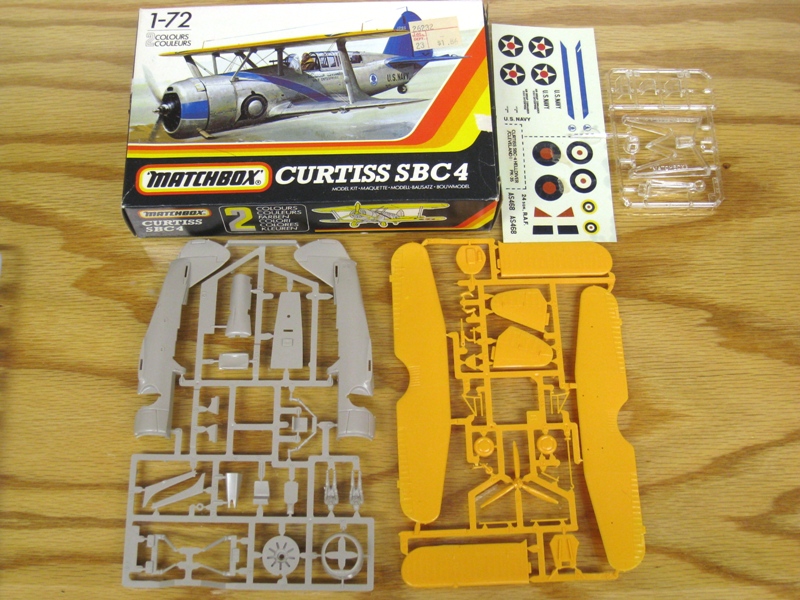
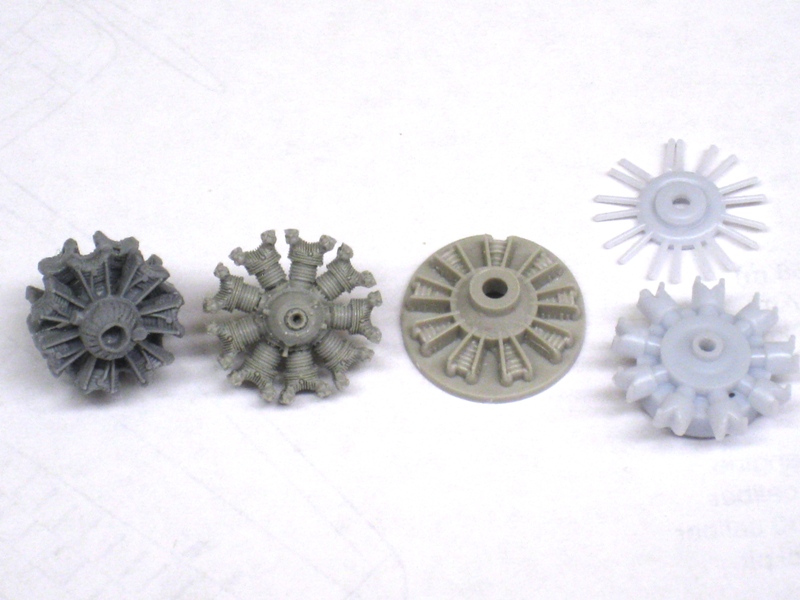
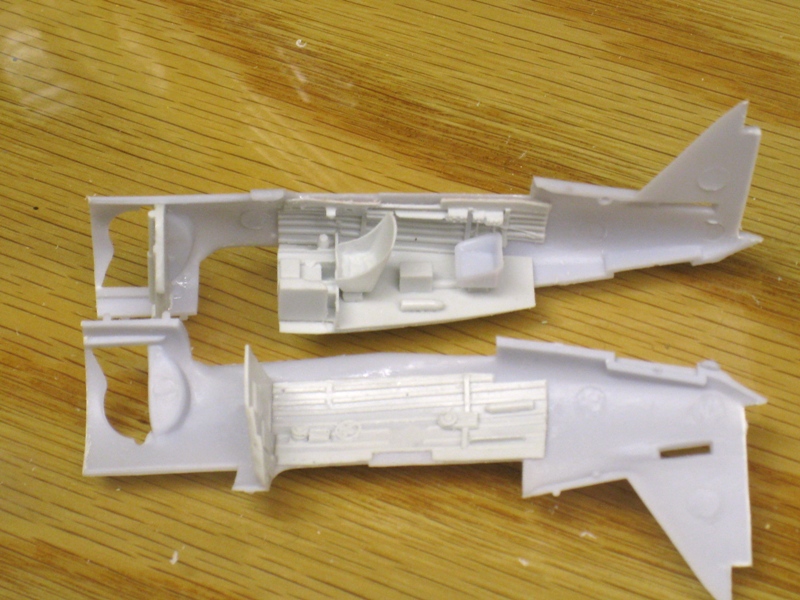
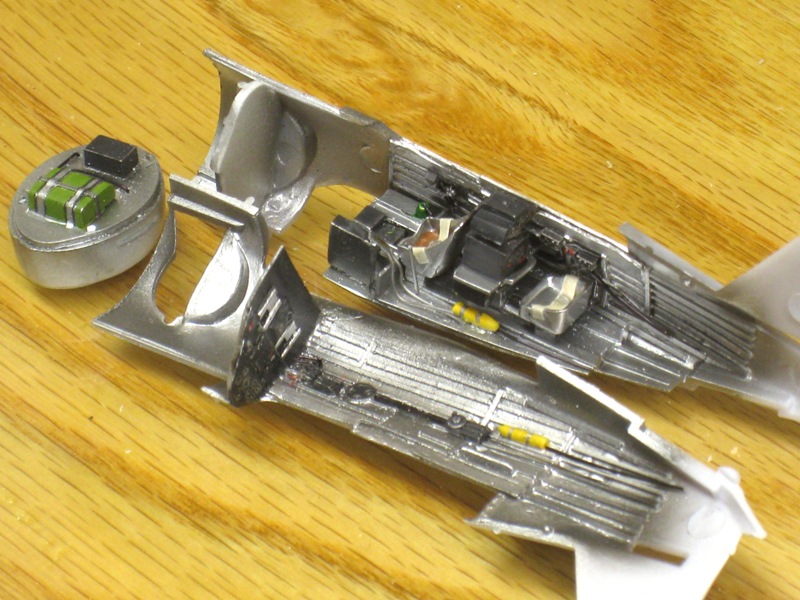
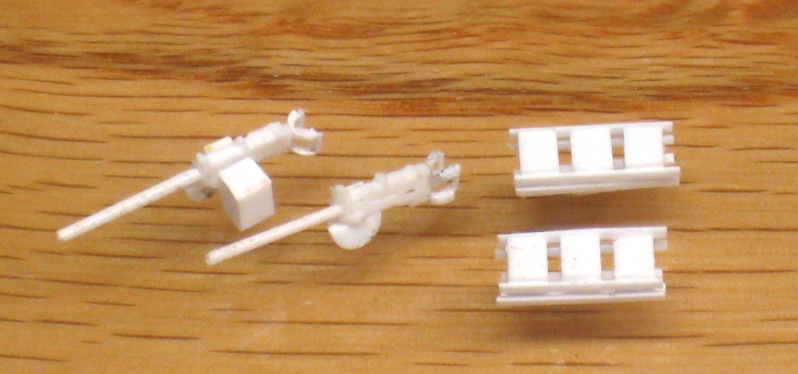
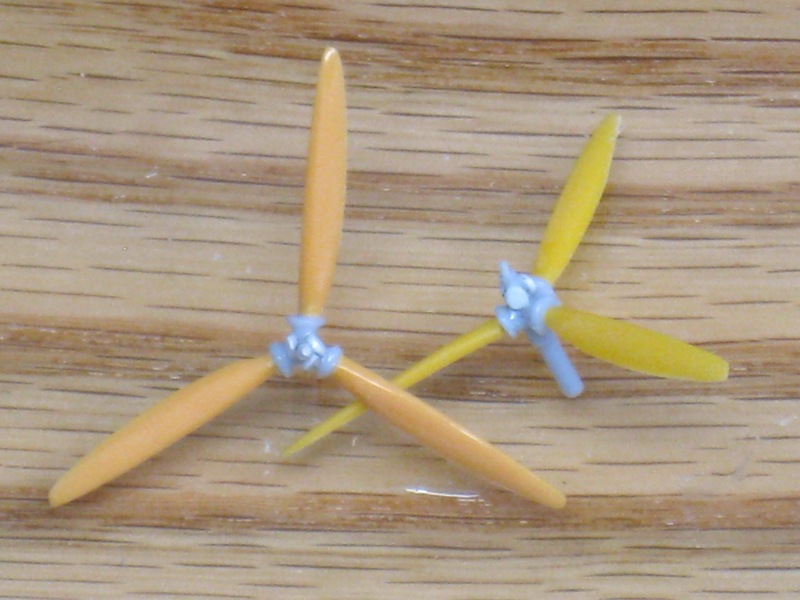
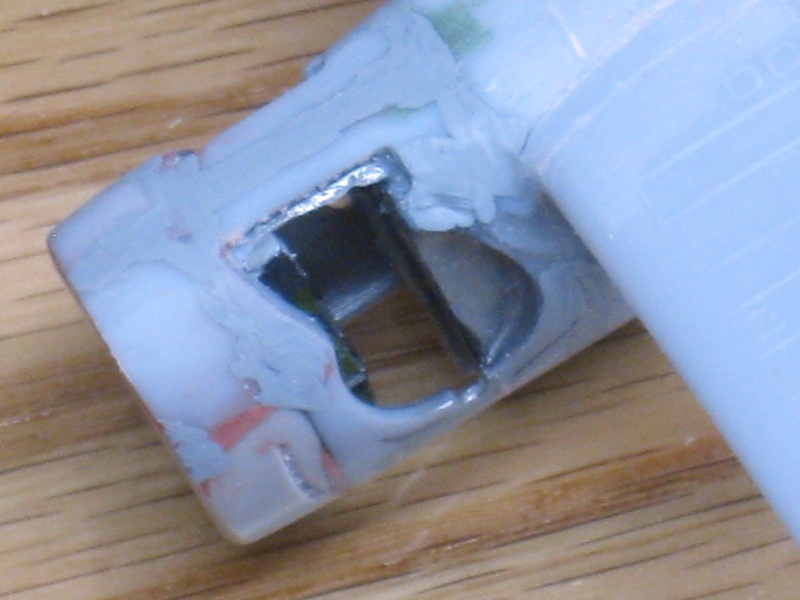
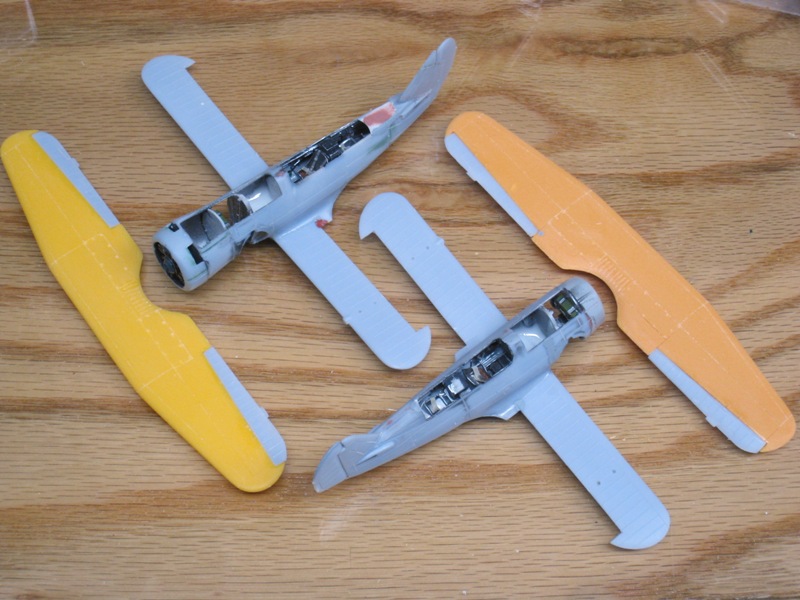
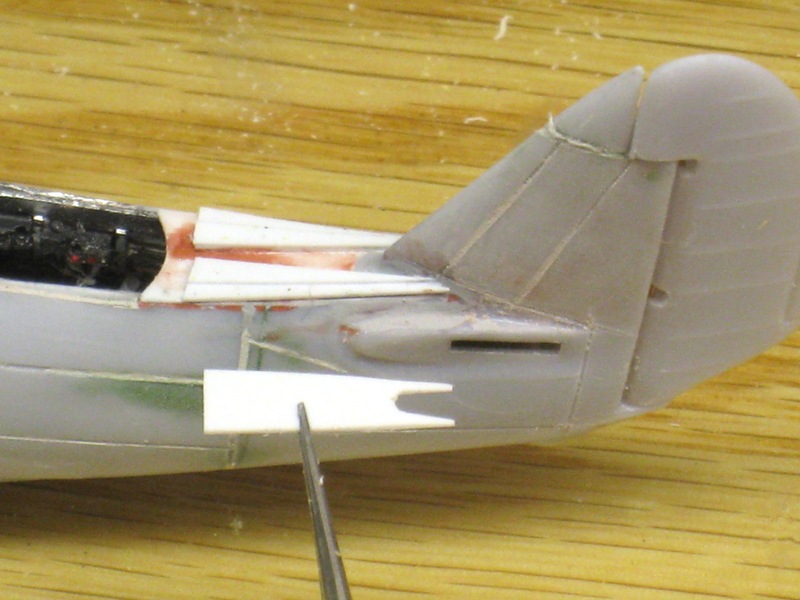
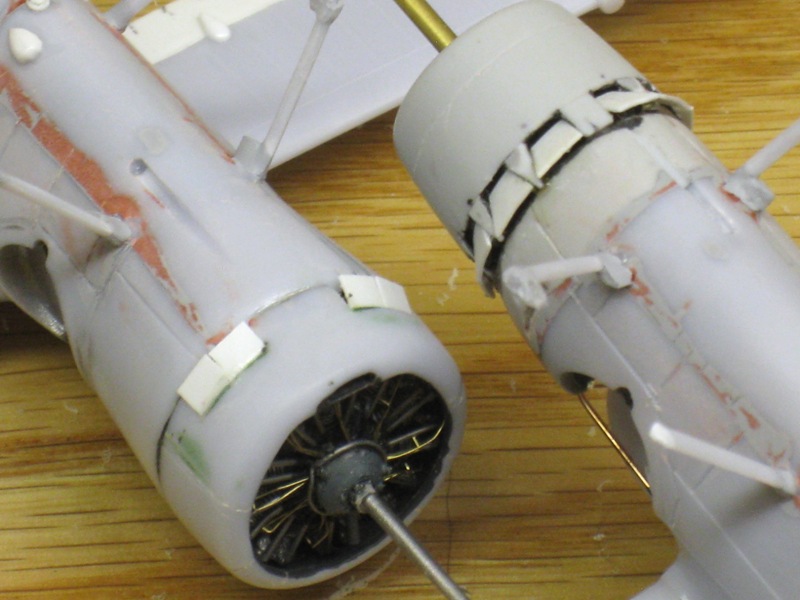
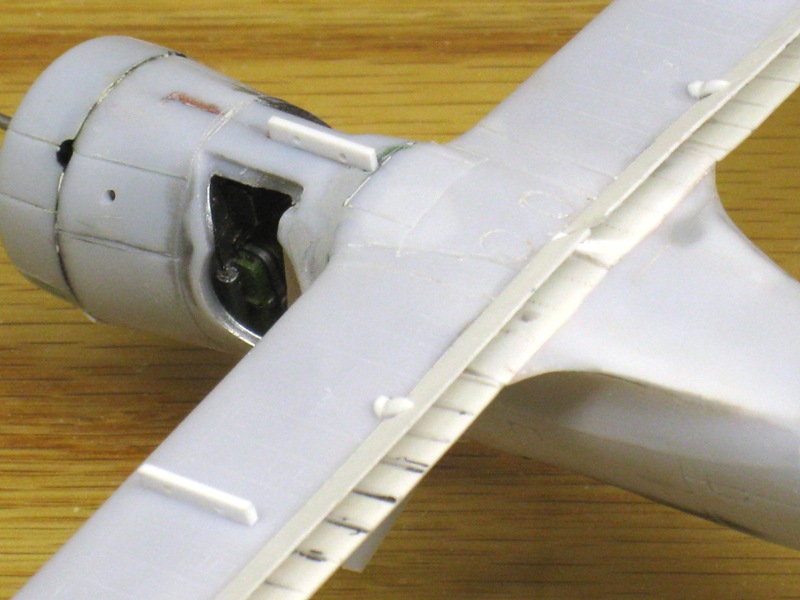
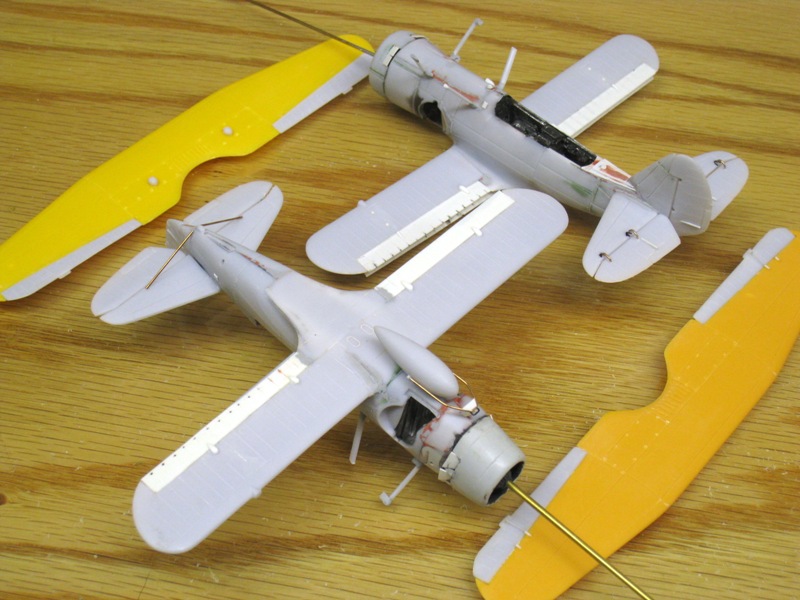
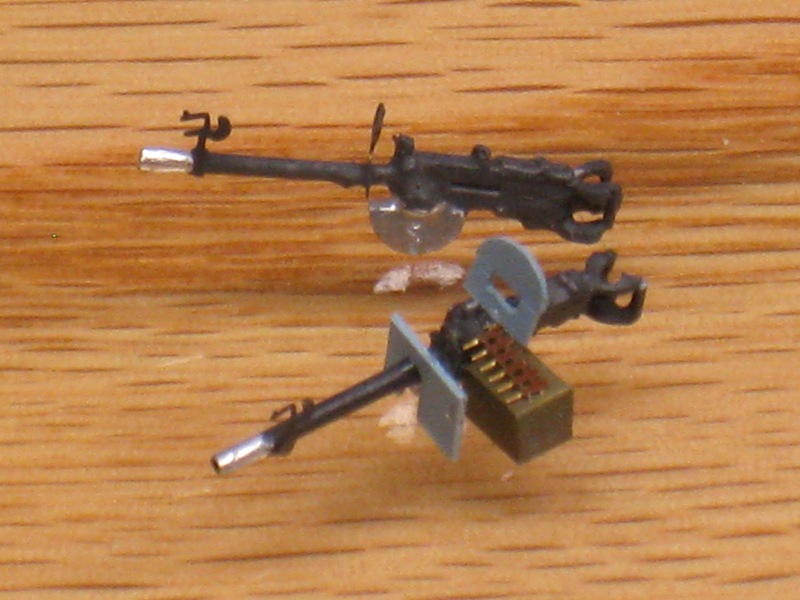
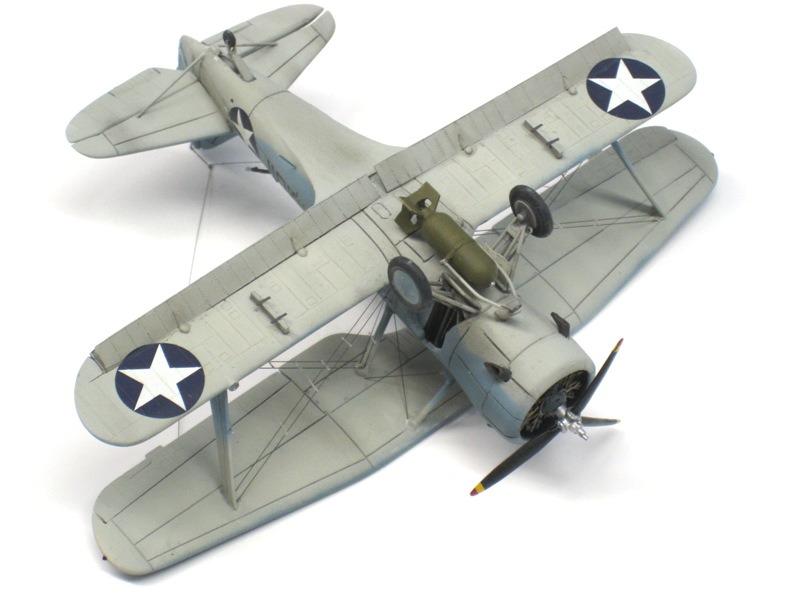
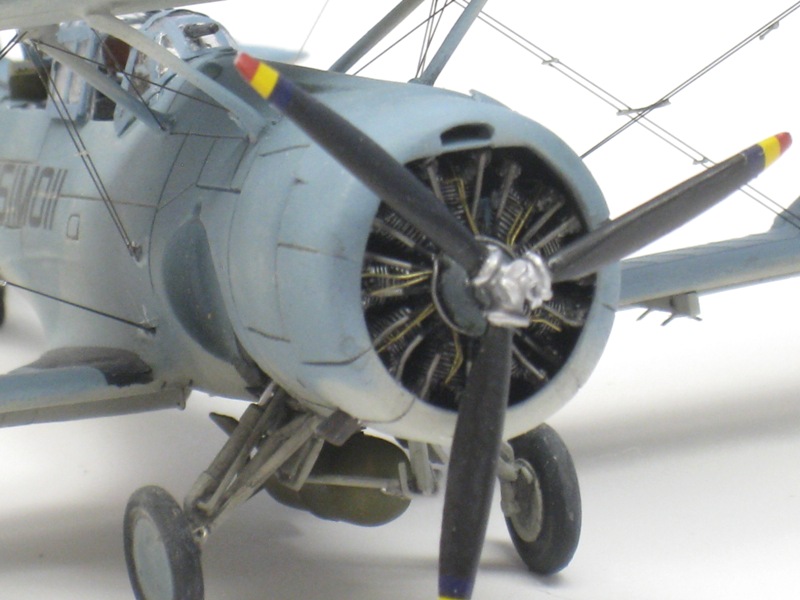
Heller and Matchbox both released kits in The Chosen Scale in 1980. Talk about two girls wearing the same dress to the dance! They are still available and very inexpensive today, I got the Heller kits from Roll Models for less than $7 each, and the Matchbox at swap meets for $2 – $3. Both are what you’d expect given the age – sparse interior detail and raised panel lines – but both are still buildable. To dress them up I’ll use the Falcon canopies, resin engines, and decals and resin interiors from Starfighter Decals.Heller generally gets the nod as the superior kit in reviews, but each kit has pros and cons. Overall, the Heller kit is more delicate, with thinner trailing edges and finer parts. Heller simulates the wing and tail ribbing with raised panel lines. After studying pictures of SBCs in the Squadron In Action book (#1151), this appears pretty accurate – the fabric was tight. Neither kit contains any bomb racks, bomb displacement gear, or bombs, (surprising for a dive bomber!) but the Heller kit does have a nice drop tank. There are no bulkheads fore or aft of the wheelwell, and Heller has depicted fabric-covered flaps, when they should be metal. The backseater doesn’t get a gun, either.The Matchbox kit is a little thicker all around. They get the placement of the fabric surfaces correct, but the fabric effect is exaggerated. Most of the kit has very fine raised panel lines, the engraving is particularly nice on the upper wing. Only on the cowling do you see the infamous trenches. Matchbox provides bulkheads in the wheelwell, and a clunky gun. They also have the option of a raised or collapsed turtledeck for the rear gunner. On the debit side the rudder profile is too rounded, and the center bracing for the upper wing angles together too much.Here’s what you get in the Starfighter -3 conversion kit. Having a different engine, the cowling and vertical tail are different from the -3 to the -4, the rest of the resin is for the cockpit and wheelwells. Coupled with the Starfighters Decal sheet 72-125, there are enough markings for six -3s and four -4s, with national marking for three aircraft total. The set also includes a small photoetch fret from Tom’s Modelworks. The instructions only call for using a few parts to dress up the gun, but there are a lot of useful parts provided with the PE (some of which I haven’t quite figured out yet). There are seatbelts, ignition wires, several gunsights, yagi aerials (not for this build), and even goggles for your pilot. Tom’s is to be commended for use of space – how many frets have we seen which had unused metal which could have just as easily been etched for parts like spare harnesses, sights, or ammo belts?A comparison of the engines. Left to right, E&T’s R-1535 to backdate the -3, Quickboost resin from their B-17 set (and you get three spares!), Matchbox, and Heller.Here’s a shot of the Starfighter resin in the Heller fuselage which will become the -3. The fuselage was thinned at the canopy rail, the resin was flexible and laid down well with CA. Starfighter gives specific direction on where to cut to make the conversion, and this shot shows the nose removed and the rudder separated.This is another shot of the -3 interior, just before I closed up the fuselage. The sides under the turtleback were visible past the Starfighter’s resin, so the ribbing has been extended aft with Plastistruct The bottom seam was hidden with card and also ribbed. The seatbelts are made from masking tape with PE buckles. The radio stack is also from the Starfighter’s kit. I cut off the entire crosspiece and shimmed the radios to get the proper height. Instrument dials are decals from the spares box.Some PE frets provide scads of minute levers, I might as well just cut them loose and dump them directly into the carpet. Here’s a trick to make things a little more manageable – use 1/700 ship’s railing. This allows you to attach levers in the same quadrants in groups. Works better if you’re ham-handed like me!Here’s the progress on the engines. The Quickboost engine on the left has pushrods and an ignition ring made from 0.015” solder, and ignition wires from 0.006” wire, then a thin wash of flat black. The E&T engine on the right had the pushrods and front wires molded on, it has just been painted Alclad aluminum and the core painted gray. The only addition at this point is the ignition ring, no additional wires have been added yet.This is the progress on the guns. The core for these are resin casts of a .30 cal from Dragon’s excellent LVT-(A)1 kit. They are molded with pistol grips, the handles were scratchbuilt. The barrels are drawn Plastistruct tube, the other details are bits & pieces. The objects on the right are ammo racks. The VMO-151 aircraft will be depicted with the gun deployed and the turtleback collapsed, the yellow wing will have the turtleback up and the gun stowed. The deployed gun will also have the armor kit added during the war.In my on-going quest to make simple things complex, I decided that Heller had the more accurate propeller hub body, Matchbox had the better prop blades, neither kit had the forward hub quite right, and both had missed the circular counterweights for the pitch mechanism. Counting the brass pins installed to deter future efforts to bust off anything bust-offable, I managed to turn one part into twelve. How’s that for OCD?This is a shot of the underside of the nose on the -3. The Starfighter’s resin plug is a little shallow compared to the cowling, so the bottom has been built up using shims fabricated from the old cowling. With the extra bit added, the replacement cowling matches perfectly. This is (hopefully) just prior to the last round of major sanding, Mr. Surfacer 500 has been applied.The aft end of the fuselage / wing join is a very thin butt joint. Heeding some on-line advice, I made everything solid by wicking in casting resign and letting it fill the bottom of the fuselage assembly to the height of the cockpit floor. Everything is quite solid now, but be careful if you do this! The resin will flow through the smallest crack, wherever gravity and capillary action can take it, and can easily wind up in places you don’t want it.Both planes have the fuselage and upper wings re-scribed and the raised panel lines sanded off. I’m not quite proficient at scribing, so I’ve filled in my mistakes and made corrections – substituting persistence for proficiency until my skills improve. The -4 has its engine and cowling on, the -3 is almost there. I’m using the Matchbox upper wings with Heller ailerons, and the erroneous fabric-covered flaps have been removed, awaiting card replacements. The upper nose decking has the struts molded on, so I’m saving attaching that piece to reduce the opportunities to break the struts off.This is a shot of the collapsed turtledeck on the -4. The gunner had to slide his canopies forward, fold down the rear deck, and mount his gun to the ring before he could fire. With the armor kits added during the war, I have to wonder if they were ever stowed or just left deployed. Here the sections are represented by 0.005” card.The -4 will also have the bottom halves of the flaps lowered. These aren’t hard to make, but cutting out all the ribs from 0.01” square stock will leave you cross-eyed. I cheat. I coax the ends of all the stock out of the package, measure once, and cut ten ribs at a time.One really neat feature of the -3 that I wanted to represent is the cowl flaps. They are unusual in that they are hinged in the middle – the forward end goes in and the after end goes out. Here the cowl flaps have been cut out, and the triangular pieces between them have been replaced. In most pictures, the two upper flaps are closed even if the other three on each side are open.
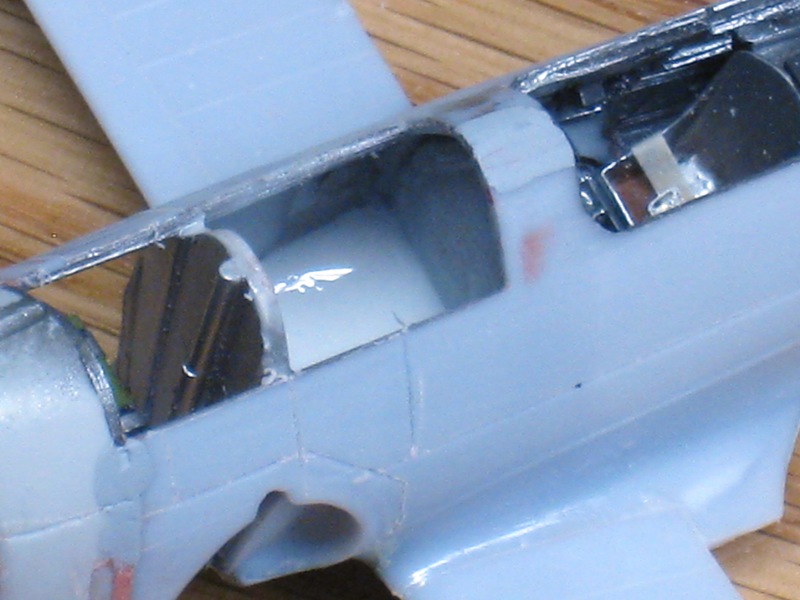
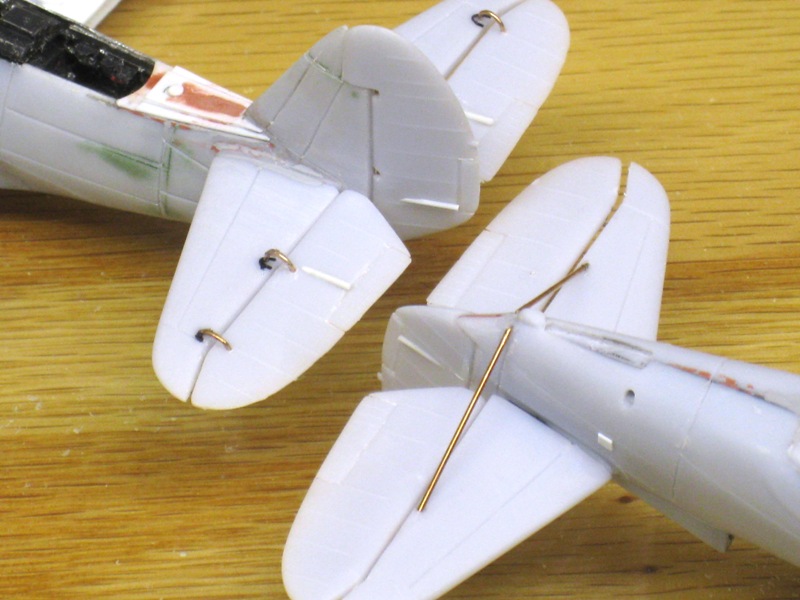
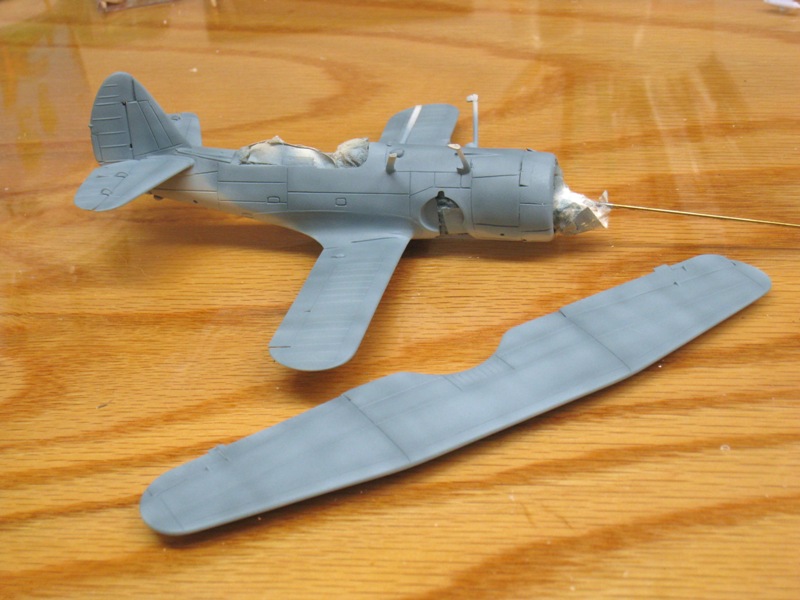
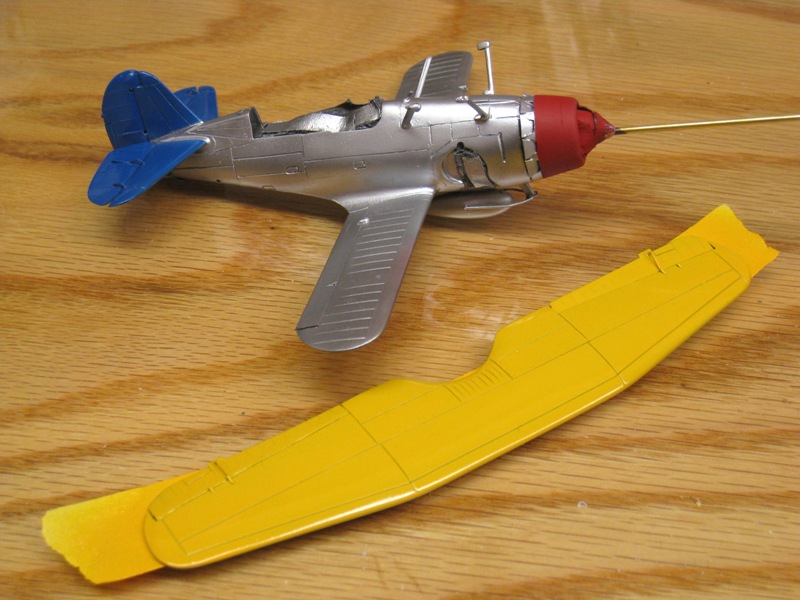
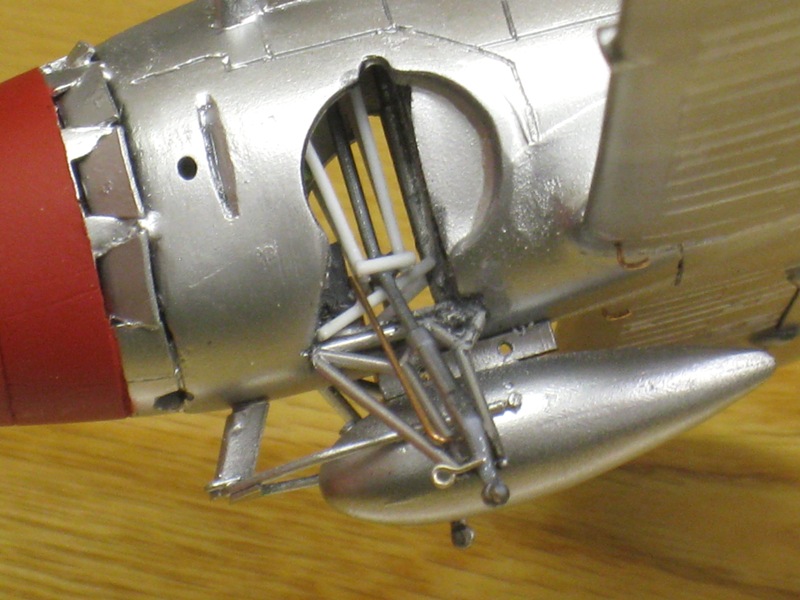
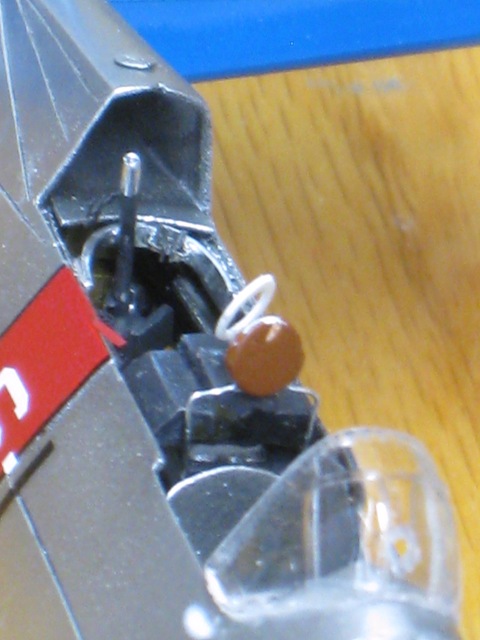
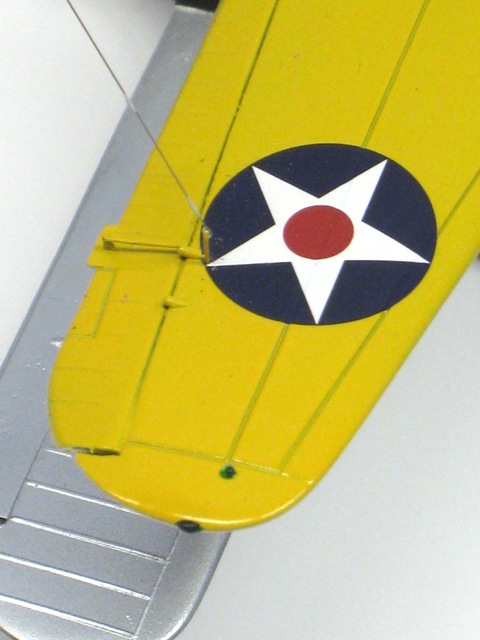
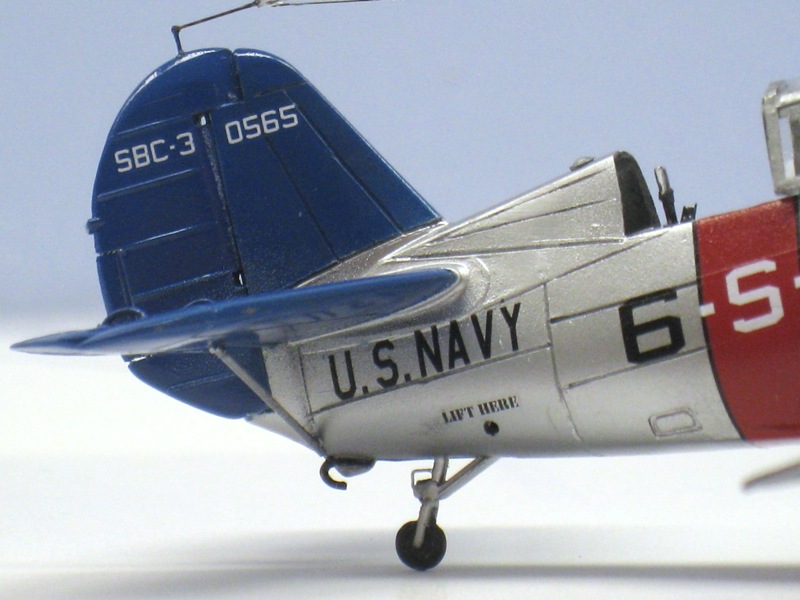
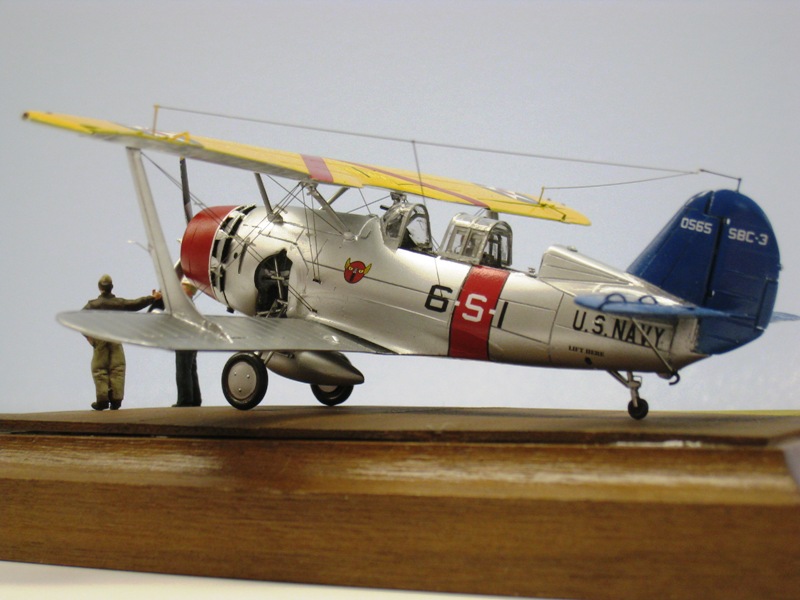
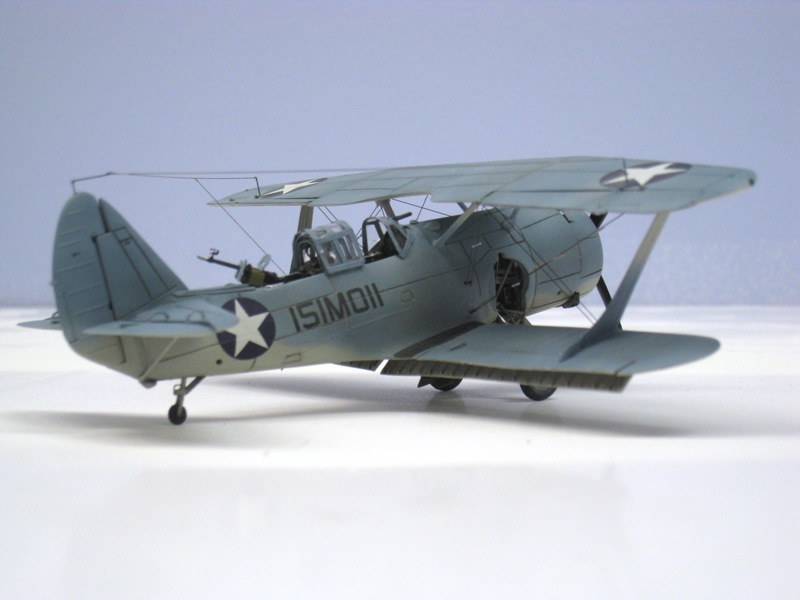
This is a shot of the noses of both kits. You can see there were some fit issues with the upper cowlings. All the cowl flaps are open, I thought the design of the -3’s was particularly interesting so I wanted to show them. The rigging wire attachment points have aerodynamic fairings added at the cowl struts, the rather bulbous ones at the top of the rear fittings were made by rounding sprue and are mounted to the underside of the upper wings.Here the elevator attachment arms are fabricated from 0.02” wire, as are the supports underneath. The elevators pivoted around the attachment points for these arms, some pictures of the aircraft show the leading edges of the elevators above or below the plane of the horizontal stabilizer. I have left them flat here for painting purposes, but will deflect them as the models are finished.This is the underside of the -4, showing the split flaps with the bottom half deflected. The flaps were fabricated from 0.005” card, with ribs from 0.01” square stock. This model has all three bomb racks fitted, the wing racks will be empty.Most of the surface detailing is now done – at least the parts I wanted to add before painting. This is an overall shot of both models, to show the upper and lower surfaces. Lots of doodads added onto these planes, especially around the flying surfaces. I have already mounted the Heller drop tank to the -3, it will be Aluminum so it can be painted with the rest of the aircraft. The rack and bomb displacement gear had to be scratchbuilt, no parts for this in either kit. It strikes me as strange to kit a dive bomber without bombs, but fortunately bombs are not hard to find in other kits.This is the camouflaged -4, showing the toning of the Blue Gray paint.… and the much cleaner -3 in the Yellow Wings scheme. The main painting is done, they are starting to look like they might be aircraft someday! Some detail work on the smaller bits is getting done while the paint dries. Everything has covered well so far, with the exception of the yellow, which took three coats. Not unexpected.A detail of the .30 caliber guns with PE from Tom’s Modelworks.Decaling is done, and they’re up on their gear. Getting close now! The Starfighter decals are very well printed and went on without a hitch. A coat of Future (Klear) was applied to the -4 and the red nose of the -3. The red of the section markings on the -3 is lighter than the Insignia Red of the other markings, the rest of the markings match the Testors’ Insignia Red on the nose to a “T”. My bad for not catching it sooner, or I’d have painted them all to keep consistency.Here is a shot of the interior of the wheel well. There is more bracing inside than what is provided in either kit, the additions were fabricated from 0.02” Plastistruct rod and 0.01” wire. Also added were catapult bridle hooks, and towing eyes at the base of the gear struts. The “bicycle chain” retraction mechanism attaches to the middle cross brace, it will be added after the rest is painted. Alot of the lower portion of this will be hidden by the wheels.Here is the last round of fiddlybits in the cockpit. The gun ring is roughly ¼” (6mm) in diameter. A mounting bracket made of a folded section of 1/700 ship’s ladder is attached, and the gun is in its stowed position to match the excellent sketch included in the Squadron book. The headrest and DF loop were fashioned from card stock using a Waldron punch set. The headrest will get another coat of leather paint, as thick as possible. The distortion of the paint drying will give the “leather” padding some depth.This is a shot showing the underside detail on the -4. The bomb was robbed from a Hasegawa P-40. The exhausts are from the Matchbox kit, and have been hollowed out. The pictures of VMO-151 aircraft show that they were weathered, faded, and used – but not neglected. I added 30% white to my base coats, and then airbrushed darker tones to add depth to the finish. The color separation line was done with masks, using the thin cardboard from the kit box. After a coat of Future and decals, the undersides were washed with Testor’s acrylic RLM 75, the uppersurfaces were washed with RLM 66. Lastly, I applied coats of flats and Vallejo weathering pigments to blend it all together.Detail of the wingtips, showing the ailerons slightly deflected. The wingtip lights are Microscale Krystal Klear, tinted with food coloring and applied over a dot of silver paint. The fairings and actuators were added before painting, but the short antenna mast was added afterwards so it would not interfere with the decals. The antenna wires and rigging are 0.005” Nitinol wire (great stuff). The insulators are painted on.This is the tail assembly on the -3. The -3 had a shorter vertical tail than the -4, the Starfighter conversion set provides a resin replacement. I ended up using the resin as a template, and reshaping the kit parts rather than fitting and filling the seam. The tailhook should only be on carrier-based aircraft, they were typically removed from shore-based aircraft to save weight. The tailwheel fork was drilled out, I try to avoid cutting up the tailwheel assembly if I can because it weakens the part so much.The build is pretty much complete at this point. In the end, I used the upper wing, interplane struts, exhausts, and prop blades from the Matchbox kit, the rest of the parts are Heller or aftermarket. Either kit is certainly buildable, I’d probably start with the Heller kit if I had to choose just one. In my opinion, the biggest problem with the Heller kit is the lack of interior bulkheads for the wheelwells and lack of struts inside. There are bulkheads provided in the Starfighters resin sets, and the Matchbox kits also have them.
USS Saratoga was the second of two Lexington class aircraft carriers converted from battlecruisers to comply with the Washington Naval Treaty. She was at San Diego during the Japanese attack on Pearl Harbor on 07DEC41, but she soon sailed West. On 11JAN42 she was torpedoes by the Japanese submarine I-6. While under repair her 8” guns were replaced with 5”/38 dual-purpose mounts and torpedo bulges were added. She just missed the Battle of Midway, arriving back at Pearl on 06JUN42. Here she is seen at Pearl Harbor in July 1942 wearing Measure 11 camouflage.A beautiful shot of Saratoga underway taken about the same time frame. On her deck are an assortment of F4F Wildcat fighters, SBD Dauntless dive bombers, and a single TBM Avenger torpedo bomber with folded wings.During the Guadalcanal Campaign Saratoga operated in a combined Task Group along with USS Enterprise (CV-6) and USS Wasp (CV-7). Here is Saratoga framed by a Wildcat on the deck of Enterprise, screened by a Farragut class Destroyer and a New Orleans class Heavy Cruiser.An atmospheric photograph of Saratoga operating with Enterprise during the Solomons Campaign. Overhead is an SBD Dauntless.Saratoga maneuvers with a destroyer in her wake. The destroyer is in the “plane guard” station, ideally positioned to perform a quick rescue should a pilot ditch his aircraft while landing or taking off.On 31AUG42 Saratoga was hit by a torpedo fired from the Japanese submarine I-26. She is seen here anchored off Tongatapu with a 9-degree list, undergoing temporary repairs before returning to Pearl Harbor.On the far left a South Dakota class battleship screens Saratoga. Battleships were valuable screening ships due to their very heavy anti-aircraft gun batteries. In the foreground is a Mahan class destroyer with a New Orleans class heavy cruiser in the center.Flight deck operations, likely sometime during 1944. Three Grumman F6F-5 Hellcats are spotted next to the island while another is seen recovering in the background. In the foreground yet another Hellcat is seen riding the elevator down to the hanger deck.A nice detail photograph of Saratoga’s Island structure. She is moored alongside Ford Island in Pearl harbor, July 1945.Saratoga was the oldest U.S. carrier to survive the war and was declared surplus. It was decided that she would be one of the test ships for “Operation Crossroads”, designed to evaluate the effects of atomic bombs on warships. “Able” would be an airburst, “Baker” would be detonated below the surface. Both devices had a calculated yield of 21 kilotons. This is the Baker device at the moment of detonation on 25JUL46, approximately 400 yards from Saratoga. What the Japanese failed to do in four years of war, the atomic bomb tests accomplished. Saratoga survived the “Able” bomb test, but was sunk by “Baker”.
Widely regarded as one of the most beautiful aircraft designs, The Beechcraft Model 17 Staggerwing first flew in November 1932. Designed for the civilian market, it was intended as an executive transport. Here is a UC-43 in the USAAF Olive Drab over Neutral Gray scheme. AZ Models has released a new boxing of the Staggerwing in 1/72 scale.In 1942 the U.S. military became interested in the Staggerwing as a light transport or courier type. Orders were placed with Beechcraft for new production airframes and civilian aircraft were pressed into military service. In The USAAF the type was known as the UC-43 Traveler, in U.S. Navy service they were known as GB-1 or GB-2. Here is a line up of new UC-43s with GB-2s further down the line. (USAF Photo)Here are a trio of USN GB-2s in flight. The graded scheme and red surround on the national insignia identify the time as the summer of 1943. Among military personnel the aircraft was coveted and considered a status symbol.The British acquired 106 airframes as the Traveller Mark I under Lend-Lease, and added the extra “l” to the Traveller name. Here is an example in British markings, this is the personal aircraft of Prince Bernhard of the Netherlands.The Staggerwing is very appealing in civilian colors as well, this Model 17 on floats in Imperial Oil colors is particularly attractive. There are several surviving aircraft flying today in a wide range of colors. (AirHistory.net)The interior is a bit cramped but elegant. This is the restored interior of the National Air and Space Museum’s example. (NASM)
WHENEVER ANY FORM OF GOVERNMENT BECOMES DESTRUCTIVE OF THESE ENDS (LIFE,LIBERTY,AND THE PURSUIT OF HAPPINESS) IT IS THE RIGHT OF THE PEOPLE TO ALTER OR ABOLISH IT, AND TO INSTITUTE A NEW GOVERNMENT― Thomas Jefferson