Aoshima Kawanishi N1K1 Shiden 紫電 Violet Lightning “George” in 1/72 Scale

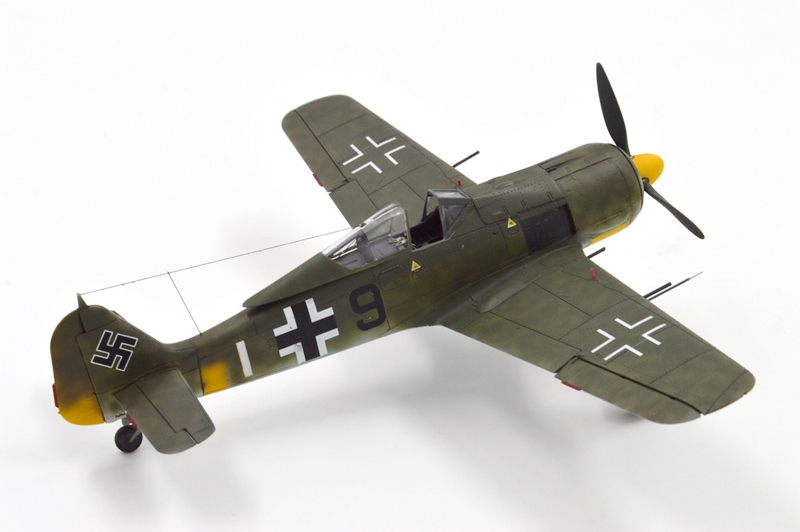
The Aoshima Shiden series are nice kits but are often overlooked.  This is the N1K1 with the redesigned wing incorporating all four Type 99 20 mm cannon internally.  The kit has shallow wheelwells but a passable cockpit.  The clear parts are a strong point and the canopy can be posed in the open position.  The gear doors do need replacing as they are thick and molded into the landing gear legs – an odd choice for such a nice kit.  Markings are from a Kopro decal sheet and represent a Shiden of the Yokosuka Kokutai.

DSC_5347


DSC_5346


DSC_5344


DSC_5343


DSC_4593


DSC_4594


DSC_4595


More N1K models here: https://inchhighguy.wordpress.com/2020/05/07/hasegawa-kawanishi-n1k2-shiden-kai-%e7%b4%ab%e9%9b%bb-violet-lightning-george-in-1-72-scale/

Consolidated PBY Catalina Color Photographs Part 2 – Details

PBY_21
A nice view of the nose of a PBY at NAS Corpus Christi, Texas taken in 1942 while a mechanic makes adjustments to the starboard engine.  The aircraft in the background are assigned to training as evidenced by the high-visibility yellow upper wing surface paint.  (Howard Hollum photograph)
PBY_22
The PBY-5 introduced the characteristic waist blisters on the fuselage aft of the wing.  These improved the visibility and arcs of fire for the gunners.  Here is a view of the port waist gunner armed with a Model M1919 .30 caliber Browning machine gun which was the standard flexible defensive armament on USN aircraft at the beginning of the war.
PBY_23
Another view of the port waist gun position, the can on the left of the gun held ammunition, that on the right collected the spent cartridges.
PBY_24_CorpusChristi42
Here the gunner prepares to board the aircraft with his weapon using the detachable ladder.  Note that the fuselage is camouflaged in two different colors.
PBY_25
An obviously posed photograph, but one which shows useful details of the detachable beaching gear.  The Catalinas were flying boats through the PBY-5 series, but became amphibians when retractable landing gear was fitted to the PBY-5A.
PBY_26
Many interesting details are visible in this view of a crewman fueling an early PBY in the pre-war Yellow Wings scheme.  Note the paint wear around the fueling ports and the exhaust staining.  Another PBY passes by in the background.
PBY_27
Officers inspecting the starboard engine of another Yellow Wings PBY.  Pre-war propeller warning markings were bands of Red, Yellow, and Blue.  These were generally not over-painted even after the tip color was later changed to Yellow, it is possible to see the three-color tip markings on some mid-war aircraft.  The clear yellow varnish on the main body of the propeller blades is not common but can be seen on several aircraft types.
PBY_28
No tip warning markings on this propeller.  This picture also shows details of the wing bomb attachment paints and landing light.
PBY_29
Given the fill point being serviced I suspect this is the oil tank being topped off.  Radial engines were notorious oil leakers.  Another aircraft with the varnished propeller blades.
PBY_30
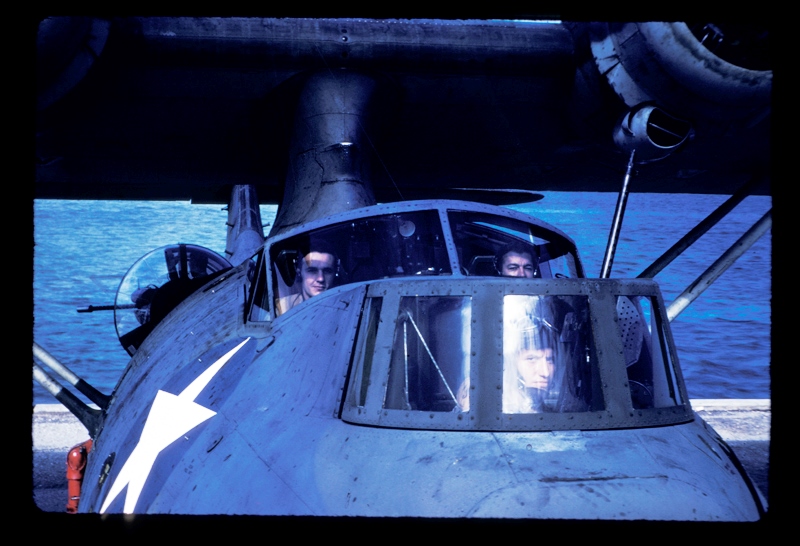
A close up view of a PBY on the ramp with the crew visible at their stations.  Crew size could vary between six to eight depending on the mission and equipment carried.
PBY_38
This is the starboard waist gun position on an early PBY.  On the PBY-1 through -4 the waist gun positions were covered with a sliding hatch with a window as opposed to the more familiar teardrop faring of the -5 and later Catalinas.  Here the gunner has deployed his .30 caliber gun and raised the hatch to deflect the slipstream over his position.

Part III here: https://inchhighguy.wordpress.com/2020/05/06/consolidated-pby-catalina-color-photographs-part-3/

Eduard Focke-Wulf Fw 190A-6 of Günther Schack in 1/72 Scale

Focke Wulf Fw 190A-6 of Günther Schack, 8./JG 51, Orel-Slowitzki USSR, 15 July 1943

This is the Fw 190A-6 of Leutnant Günther Schack of 8./JG 51 as profiled by Claes Sundin in his book Luftwaffe Fighter Aircraft #3. Schack was on my list of missing Experten schemes for quite some time so I was very happy to find his aircraft illustrated in Sundin’s book.  Schack claimed 174 victories on the Russian front and was shot down 15 times himself.  He survived the war.  The camouflage is the standard 74 / 75 / 76 with a dense green overspray.

Eduard’s Fw 190A-8 Royal Class boxing provides everything you need to build A-6 and A-7 versions using the standard wing and unarmored fuselage parts.  Here is an A-6 “conversion” using the earlier upper cowling parts.  The pitot tube is moved from the wing tip to the middle of the wing.  The latches molded into the top of the cowling panels are filled, as is the circular panel line on the belly for the MW tank.  If the centerline rack is carried it should be moved back about 3mm.  Decals from the spares box.

Schack_04


Schack_03


Schack_02


Schack_01


DSC_5193


DSC_5192


DSC_5191


DSC_5190


Spotlight On Yakovlev Yak-3 Book Review

DSC_4926

Spotlight On Yakovlev Yak-3

By Artur Juszczak

Hardcover, 44 pages, 42 color profiles

Published by MMP Books July 2017

Language: English

ISBN-10: 9788365281487

ISBN-13: 978-8365281487

ASIN: 8365281481

Dimensions: 8.3 x 0.4 x 11.7 inches

The Spotlight On series is published by Mushroom from Poland.  These are thin books, but on a large layout and printed on glossy paper.  The books consist of a single page giving a brief history of the subject’s design, then it is straight off to the profiles.  For each there is a short caption identifying the pilot, location, and date along with some information on the paint scheme & markings.  No additional information is provided, so if you’re looking for a pilot biography or anecdotes about the aircraft’s service history or combats you’ll need to research elsewhere.

There are 42 Yak-3s profiled in this volume, the vast majority in Soviet markings and AMT 11 / 12 / 7 camouflage, although there are several exceptions thrown in for good measure.  All the profiles are of either the port or starboard sides, no plan views are provided.  Eight of the profiles are of aircraft of the Normandie-Niemen Regiment so there is plenty here for the fans of this famous French unit.

This is a quality series, and there is lots of inspiration for modelers here (provided decals can be sourced of course).  I would have liked to have seen some additional background on the individual aircraft and their pilots, it is always more interesting and inspiring to know something of the history involved.  Several of these volumes have appeared on the secondary market, often at a significant discount.  They are well worth picking up, especially if they can be found at a bargain price!

DSC_4929


DSC_4927


Junkers Ju 88 Comparison Build in 1/72 Scale, Hasegawa and Revell of Germany Kits Part III

Ju88A40018
The builds are coming together, construction is almost complete.  Time to compare some of the smaller components.  First up is a shot of the defensive weapons, Hasegawa in the darker plastic, Revell in the light grey.  The Hasegawa guns are more crisply molded, and have the spent case collection “funnels” attached.  The Revell guns have the hooded sights as fitted to the later A-4s.  My preference is for the ring and bead sights, something about the hooded sights just doesn’t look right to me.   The MG 81Zs are molded differently as well, Hasegawa has a separation between the barrels, Revell has them touching.
Ju88A40019
This picture illustrates the subtle differences between the propeller assemblies.  The spinners are dimensionally the same, but have a different contour.  Interestingly, drawings in the three primary references I’m using (Trojca, Aero Detail, and Kagero) all disagree as to which is most correct.  One thing which is noticeably off looking at photographs is the size of the openings for the prop blades – the Revell openings are too large.   I have cast copies of the Hasegawa spinners to correct this, the extra hub detail on the Revell props will be hidden.  Another difference is the spinner base is a separate piece on the Hasegawa kit, Revell has molded this as part of the engine nacelle face.  This will determine the prop position, and may make painting more difficult for some schemes.
Ju88A40020
The Ju 88 had four doors on the main gear bays – two large doors at the aft end of the engine nacelle which were normally closed, and two smaller doors forward where the gear legs came out.  The gear rotated 90 degrees on retraction, laying flat in the nacelle similar to the P-40. What this means is that between the small opening, doors, and struts, not much is visible inside the bays.
The main wheels in both kits come in two pieces, leaving a seam down the middle.  A few minutes with a file eliminates the seams, a few more with a razor saw restores the treads.  The main gear legs are proportioned differently by each manufacturer, as you can see in the photo.  As illustrated in the previous post, the attachment points within the nacelles are engineered differently on each kit, so I am waiting to see if these require modifications to achieve the proper “sit”.  Hasegawa provides the rocking lever at the top of the leg, and also the “tripod” structure on the retraction assembly.  While the tripod is overstated, Revell omits both pieces.  Moving on to the doors, Revell’s are finer with better detail, while Hasegawa’s have ejector pin marks on each which must be removed.  Revell’s tailwheel is slightly smaller, and they also provide a forward bulkhead within the tail wheel well.  Again, my drawings are contradictory regarding the size of the tailwheel.

Ju88A40021

Ju88A40022
The construction crew verifying wing dihedral measurements.  Even though I got the pictures a bit crooked, I tried to place the blue “horizon” line across the wingtips to provide a visual reference.  Both kits check out OK.  If you look closely at the Hasegawa kit, there is a slight gull wing effect between the fuselage and the engine nacelles, the line should be straight from the roots to the tips.
Ju88A40023
Here’s a shot comparing plan views.  There are differences, but both look like a Ju 88 when built up.  The putty shows the fit of the kits, pretty good overall, but some work was needed on the wingtips.  I wouldn’t expect that would be much of a challenge to get right, but both kits needed a little extra work to get this joint smooth.
Ju88A40024
Canopies are a bit fiddly on both kits, but the Eduard masks ease the pain.  Make sure you get the mask set intended for your kit, as each are framed slightly differently – CX 159 for Hasegawa, CX 309 for Revell.  Each upper canopy consists of three pieces, each gondola consists of four.  Hasegawa molds the four small windows aft of the nose transparency as separate pieces, Revell uses a single piece.  I rarely get frustrated with assembly, but I had to walk away from the Hasegawa kit twice.  The gondola is a royal pain, but I’ll save you some frustration.  The parts are tabbed to give a more solid attachment point, but the thickness of the parts is different.  This results in a pronounced step between pieces.  Once I realized what the problem was (I’m a bit slow at times), I cut off the tabs and life got easier.  The four small windows were also quite frustrating.  The first gleefully offered itself up as a sacrifice to the carpet gods, the second and third did not fit well, and the last I couldn’t fit at all because the wiring detail I added was in the way.  In the end, I decided that MicroScale Crystal Clear was going to be my friend.  Revell definitely takes this round, just on frustration alone!

Part IV here: https://inchhighguy.wordpress.com/2020/05/01/junkers-ju-88-comparison-build-in-1-72-scale-hasegawa-and-revell-of-germany-kits-part-iv/

Tamiya Kawanishi N1K1 Shiden 紫電 Violet Lightning “George” in 1/72 Scale

Tamiya’s N1K1 is a little gem but is overlooked by most modelers.  It has the fit and finished we have come to expect from Tamiya and goes together without any issues.  I detailed the cockpit and replaced the cannon barrels with brass from Master, but this kit looks great right out of the box.  The markings represent an aircraft of the 341st Kokutai at Marcott in the Philippines in October 1944, by January the squadron had been wiped out.

DSC_5327


DSC_5328


DSC_5329


DSC_5326


DSC_4589


DSC_4590


DSC_4592


More N1K models here: https://inchhighguy.wordpress.com/2020/04/30/aoshima-kawanishi-n1k1-shiden-%e7%b4%ab%e9%9b%bb-violet-lightning-george-in-1-72-scale/

Consolidated PBY Catalina Color Photographs Part 1

PBY_01
A beautiful shot of an RAF Catalina I in flight.  The RAF began operating the Catalina in 1940.  The aircraft wears the standard Temperate Sea scheme of Extra Dark Sea Gray and Dark Slate Gray over Sky.
PBY_02_NASCorpusChristi_Aug42
Another Catalina in the RAF Temperate Sea scheme, but this time in U.S. markings at Naval Air Station Corpus Christi in August 1942.  A number of aircraft on British order were pressed into U.S. service after Pearl Harbor.
PBY_03_SegulaIsland_Aleutians
A PBY passes by Segula Island in the Aleutians.  While it makes for a visually interesting picture, the ruggedness of the terrain is also apparent.  (LIFE Magazine photograph)
PBY_04
This PBY illustrates the propensity in the Aleutian Theater to deviate from standard insignia protocols.   All the national insignia visible on this aircraft carry the red outline briefly authorized during the Summer of 1943, although by that time the insignia was not supposed to have been carried on the upper surface of the starboard wing.
PBY_05
Another LIFE Magazine photograph showing a PBY over the inhospitable Aleutian terrain.  Prior to the Pacific War the U.S. Navy had declared seaplane operations in the Aleutian Winter to be impossible, but wartime requirements soon forced a reassessment.
PBY_06_PV-1_Aleutians_1943
The PBY with its successor in the Aleutians, the PV-1 Neptune.  Both aircraft carry the mid-1943 style national insignia.
PBY_07
Crewmen performing engine maintenance on a PBY-5A of VP-31.  The spray strake on the bow is clearly visible, as is the search radar aerial on the port wing.
PBY_08
The USAAF operated the Catalina in the Search And Rescue role, designating their aircraft the OA-10A.  This white example displays a USAAF serial on the vertical tail and the streamlined radar housing which first appeared late in the PBY-5A production run.
PBY_09_USCG_PBY_Greenland
The USCG also operated the PBY-5A, this example is seen in the Atlantic ASW camouflage scheme of Dark Gull Gray over White parked on the Marston Mat apron in Greenland.  Note the Quonset hut buildings in the background are all marked with the U.S. insignia.
PBY_10
A PBY-5A amphibian with its wheels lowered for a shore landing in the late-war camouflage and insignia.  (LIFE Magazine photograph)
PBY_31_PBY-5 trainers NAS Pensacola
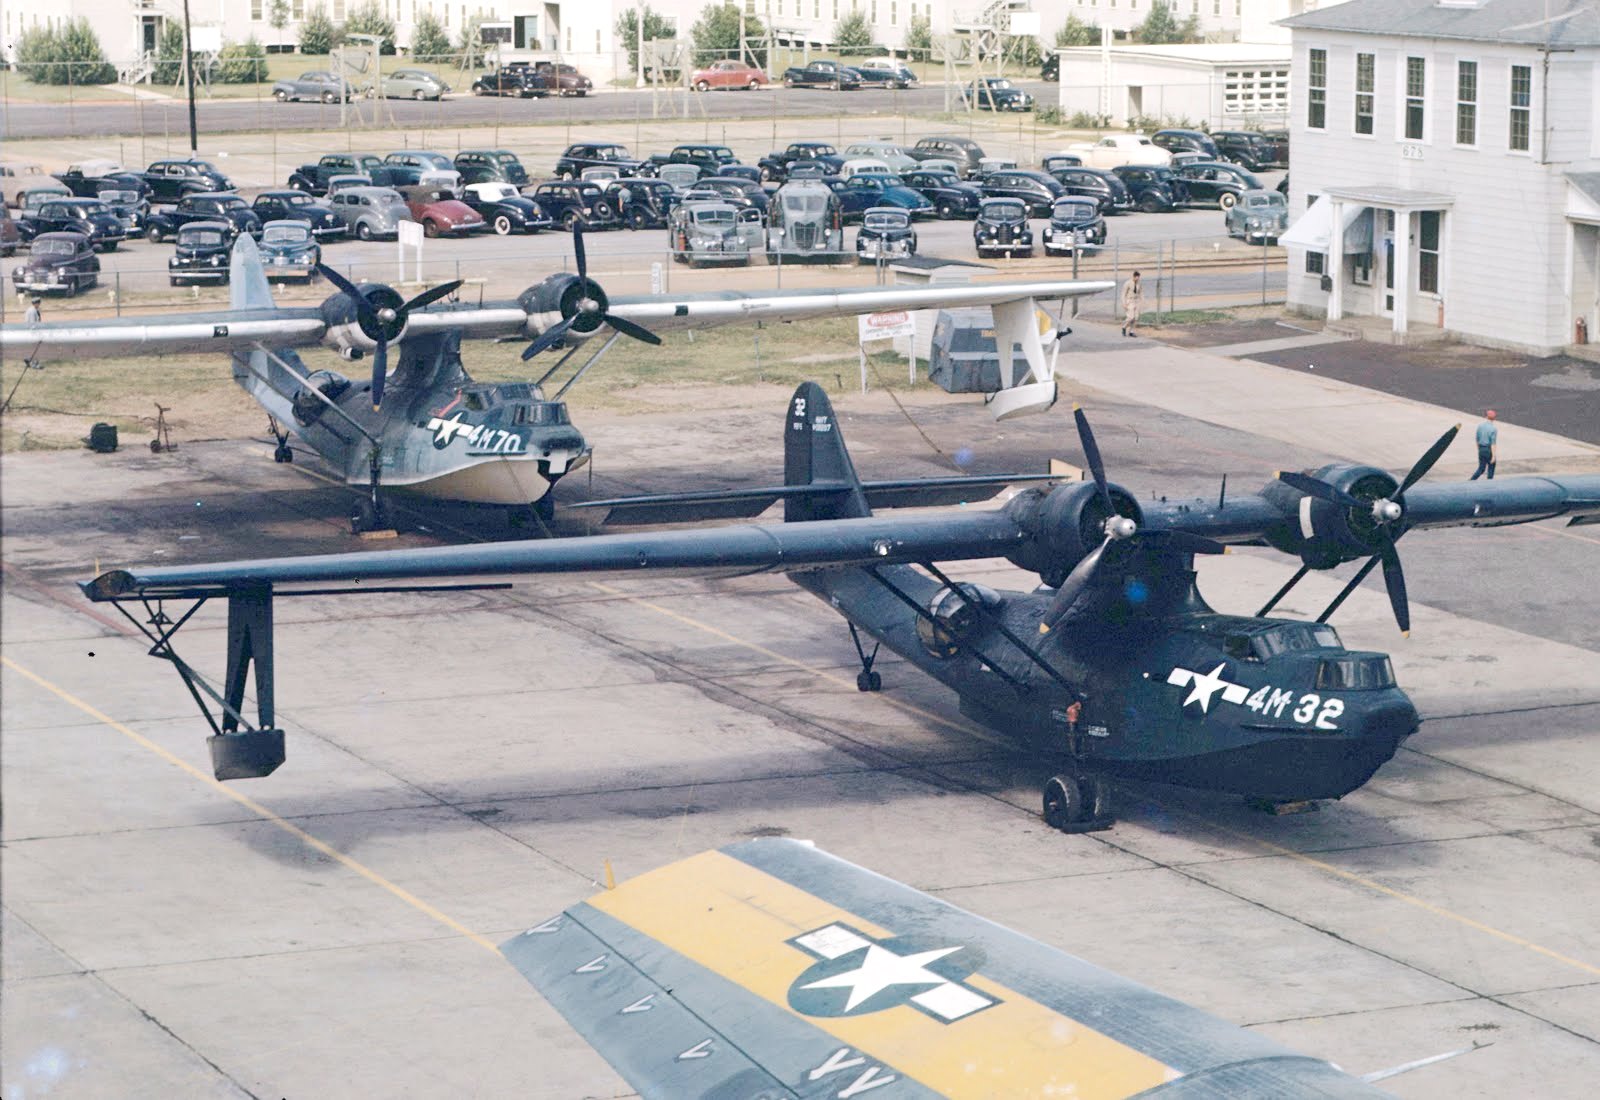
These PBY-5As seen on the ramp at NAS Pensacola display a variety of camouflage and markings.  These aircraft are serving in the training role.  Of interest is the “V” tape visible on the aileron and wing of the aircraft at the bottom of the photograph, this feature can be seen in pictures of many PBYs.
PBY_32
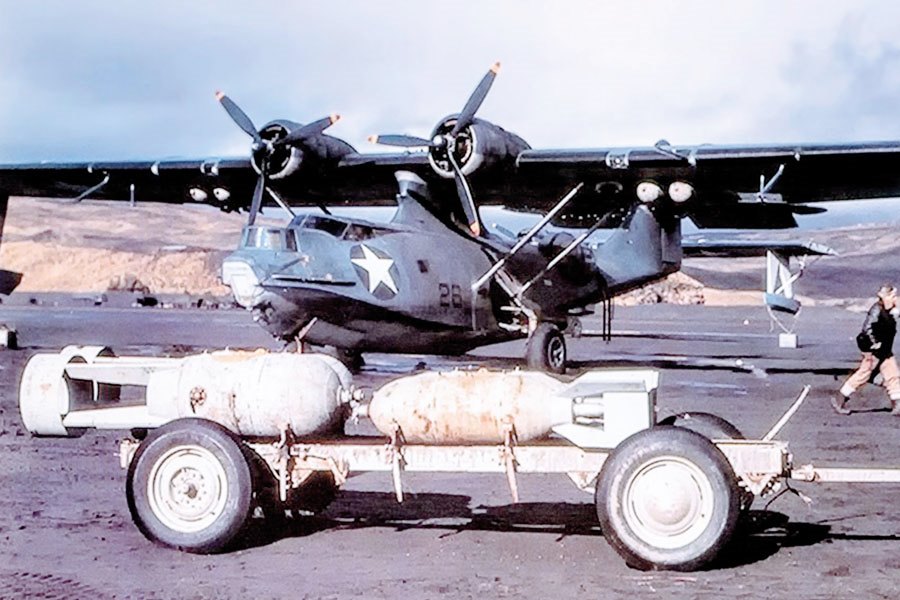
A bombed-up PBY on the ramp in the Aleutians, in the foreground is a bomb cart carrying a 500 pound bomb and two depth charges.  U.S. ordinance can be seen in various colors and states of preservation, these appear to be in a Light Gray and are unmarked.

Part II here: https://inchhighguy.wordpress.com/2020/04/29/consolidated-pby-catalina-color-photographs-part-2-details/

Fine Molds Messerschmitt Bf 109 F-2 of Hans “Assi” Hahn in 1/72 Scale

Messerschmitt Bf 109 F-2 of Stab III. / JG 2, St. Pol France, July 1941, pilot Hans Hahn, Fine Molds kit.

Hans “Assi” Hahn was credited with a total of 108 victories, 66 in the West against the Allies and 42 against Russians in the East.  Hahn translates as “rooster” in English, thus his personal emblem on the cowl.  “Assi” Hahn was shot down on 21FEB43 over Staraya, Russia and spent the next seven years in Soviet captivity.

Hahn_01


Hahn_02


Hahn_03


Hahn_04


DSC_5128


DSC_5129


DSC_5130


DSC_5131