Junkers Ju390 V2 Conversion in 1/72 Scale

Here are completed pictures of my Ju 390 in 1/72 scale.  The model was constructed using two Revell of Germany Ju 290 kits.  It represents the Ju 390 V2 developmental aircraft serving FaG 5  at Mont de Marsan in France during the Spring of 1944.  Even in 1/72 scale this is a large model with a 27.5 inch (69.9 cm) wingspan.  Research and construction notes are posted in this blog.


Ju390_32


Ju390_31


Ju390_18


Ju390_17


Ju390_16


Ju390_15


Ju390_41


Ju390_42


Ju390_43


Ju390_44


Ju390_45


Ju390_33


Ju390_34


Ju390_35


Ju390_36


Research here: https://inchhighguy.wordpress.com/2019/04/24/junkers-ju-390/

Junkers Ju 390 Build in 1/72 Scale, Part II

Ju390_10
Here’s a look inside the tail gunner’s position.  The thick kit seat and support was discarded, and a more delicate assembly fashioned from plastic stock, as was the “wooden” floorboard.  The ammo box is a kit part, but it is one of the choices called out to be located inside the main fuselage.  The tail gunner should have ammo too, so one of the boxes was placed here.  The two smaller boxes on the bulkhead are scratch bits.
Ju390_11
The rear plate for the nacelles is a problem.  The forward edge of this piece is stepped, which results in a trough about 2 mm wide which isn’t on the real aircraft.  Also, while a few later Ju 290’s had exhaust stubs which were covered, the majority of photographs show aircraft with the exhaust stubs protruding from the rear of the cowling.  Here is the kit part on the left, the modified part on the right has had the trough sawed off with a razersaw, and the inside whittled out with an Exacto knife, leaving just the ring.
Ju390_12
The kit propeller spinners look really undernourished.  On the right is a replacement cast from an Fw 190 spinner.  Also the tips of the prop blades have been filed down to make them pointier, to better represent what can be seen in photographs.
Ju390_13
One thing missing entirely is the armored ring on the front of the cowling.  The front of each kit cowling was filed down and the opening enlarged until they would accept a casting of the armored ring, again copied from an Fw 190.  This is a subtle fix, but I knew it would bother me knowing it was supposed to be there if I left it off.
Ju390_13B
And here’s the finished product!  A little extra work, but the nacelles look alot better, and the Quickboost exhausts add just the right amount of detail.  I wound up building all eight nacelles from both kits, and mounting the six which looked best when complete.
Ju390_14
Out of the box, the kit canopy is covered with rather bulky framing which makes it very difficult to see anything inside.  The framing is raised (really raised!), and is about twice as wide as it should be.  I whittled away all the molded frames, and then filed and sanded the canopy until it was smooth again.  A quick dip in Future (Klear) restored the shine and transparency.  The glass area was then masked off and blended into the fuselage.
Ju390_14B
After painting, the framing was restored using decal film.  One thing I noticed late in the build was just how high the forward 20 mm gun position sat off the fuselage.  If you compare this picture to the previous one, you can see how much material was filed down to lower the turret.  The barbette was cut down a little more than half, this really improves the appearance of the model.  Also, this is a good illustration of the delicacy of the PE FuG 200 radar antenna.  These are from Aimes, part PE72001, and they are beautiful!  They are also some of the more fiddly and delicate detail bits I’ve ever put on a model.  One day I hope to have all the antennas lined up straight and square at the same time!
Ju390_14C
The tail codes and Werknummer used on the model require some explanation, as there is no hard data as to what was actually carried.  The Ju 390 V2 wore the factory codes RC + DA when built, but there is no direct evidence that it was ever repainted in FaG 5’s codes when delivered.  I have presumed it was for this model, and applied FaG’s 9V squadron code and badge.  The LH is a bit more speculative.  In Luftwaffe Codes, Markings & Units 1939 – 1945, Rosch lists FaG 5 Ju 290 A-5s and A-7 as having the codes A9 + xH and A9 + xK.  Since “L” was not taken, my Ju 390 became 9V + LH.  Similarly, The Monogram Close-Up lists W. Nr. 0181 as the first Ju 290 A7, and W. Nr. 0186 as the second, with 0182 – 0185 unused.  0182 became the W. Nr. for my model.  Pure guesswork.  All these codes are obtainable using the Revell A-7 kit decal sheets.
The grouping of the codes at the rear of the fuselage is accurate, but the more I look at it the more I wish I would have chosen to duplicate another option seen in photographs and spread the codes out more along the fuselage.  It’s not necessarily wrong this way, but on my next Ju 390 I’ll do it differently.


Ju390_14D
The camouflage pattern is an extrapolation of the RLM design for Ju 290 maritime patrol aircraft.  Since the 390 is a stretched 290, I simply stretched the areas covered by the splinters, while keeping the pattern pretty much the same.  Happily, the demarcation of the camo scheme intersects the line of windows along the fuselage, which make painting much easier.

Completed model here: https://inchhighguy.wordpress.com/2019/04/27/junkers-ju390-v2-conversion-in-1-72-scale/

Junkers Ju 390 Build in 1/72 Scale, Part I

It is possible to build either of the two Ju 390s using two Revell of Germany Ju 290 kits.  In this case I’ll be building the V2 maritime patrol aircraft.  This conversion is fairly straight-forward, and is easier than it might first appear.  There is obviously a bit of sawing to be done, but the parts generally mate back with others of identical lines and cross sections.  Piece of cake, right?  Revell has boxed A-5 and A-7 versions of the Ju 290, either kit can be used for conversions as the required solid nose is in both boxes.  One benefit of using the A-7 version is there is an extra sprue with three Hs 293 anti-ship missiles for the spares box.  These are nice kits, but there are a few inaccuracies which I’ll point out as I go along.

Ju390_1
Like most aircraft models, construction began with the wings.  Doesn’t everybody start with the wings?  Well, I figured that if I was going to botch up this job, the wings were a likely place and I’d rather ruin the kits early so I could move on to something else.  Fortunately, my kits were molded in two different shades of gray, which will make it easier to show where the parts were joined.  Revell molds the lower wing and nacelles as part of the forward fuselage.  Here is the wing stub removed from one kit (light gray), and the cut line marked on the second kit with masking tape.  All the extra wingspan is added between the two nacelles which contain the landing gear on each wing.  The distance should be 2.27 inches (57.6 mm) between engine centerlines when complete.
Ju390_2
Given the long span of the wings and the Frankensteinian nature of the surgery, strength was a concern from the very beginning.  Here are the tops and bottoms of the extended wings, showing the added structure.  The main spar was made from two sizes of hollow rectangular cross-section brass stock from the LHS, soldered together and epoxied in place.  One of the kit sprues is flat, which turned out to be quite useful.  These sprue sections were glued to the inner sides of each cut to reinforce the joints, and this also served to ensure the pieces were lined up flat.  Any effort spent early on to get straight, even joints is well repaid with reduced sanding later!
Ju390_3
Here is a shot of the cockpit components.  I was able to use several PE detail parts from a spare fret intended for an He 177 to dress up the side consoles and other bits.  Both kit’s engineering stations were used, you can see into the compartment aft of the bulkhead through the open doorway.  Revell provides three very comfy looking seats to go in this compartment, but they cannot be seen so they were left off.  The instrument panel was scratchbuilt.  The backs of the instruments and wiring were added, as these are easily visible through the canopy.  The fuselage side components have been extended, more on this later.
Ju390_4
Interior detail is also visible through the waist gunners’ positions, so stringer detail was added here.   The kit loading ramp is inaccurate, it is nothing like the pictures of the real thing.  Fortunately, the inaccuracies are not apparent when the ramp is stowed.  Stringer detail is added from 0.02 inch Evergreen stock.  Note the seam placement where the cuts from the two kits come together.  I was careful to make sure that none of the cuts lined up so there would not be a weak point in the fuselage.  The floor joint is forward, the roof joint will be in the middle, and the fuselage sides are further back.
Ju390_5
If you look at interior pictures of Fw 200 maritime patrol aircraft, you see that the fuselage contained several fuel tanks.  It made sense that the Ju 390 patroller would be similarly equipped, so I constructed eight tanks out of oak scrap.  The fronts are elevated slightly on small blocks of plastic stock to give them the proper slant.  The tanks were painted off-black, and given strapping of masking tape.  The contrast between the tank and the tape is visible through the side windows.  This gives an impression of depth and detail to the interior, and eliminates the see-through look.
Ju390_6
This is the interior of the aft fuselage, painted RLM 02 and given a black wash to bring out the stringer details.  On the finished model the waist guns are deployed and the windows open, so the interior here can be seen by those with small flashlights and inquiring minds.
Ju390_7
The front office.  Paint is RLM 66, given a wash of black and drybrushed with silver.  Revell provides a decal for the instrument panel, which is unfortunately not visible in these pictures.  I used the decals from both kits, split so there were six sets of engine instruments on the panel when finished.  Some of the remaining instrument decals were used on the consoles.  Throttles were made from sections of 1/700 PE ship railing. 
Ju390_7B
Instrument wiring and rudder pedal hydraulics are visible, and bits from the spares box provided some “equipment” lower down in the nose.  The rear bulkhead was dressed up using more PE from the spare He 177 fret over plastic card.
Ju390_8
This is a shot of the underside of the cargo bay floor.  I have reinforced the floor / fuselage joint with Evergreen strip, and backed up the joint where the two floor pieces meet with scrap card.  This is probably overkill, but I didn’t want to take any chances given the size of the model and the number of cuts in the panels.  A split seam would ruin the whole job.
Ju390_9
Major assembly is complete!  It looks like a quilt, but most of the joints are quite smooth.  All the cuts were measured to the lengths given in Green’s Warplanes of the Third Reich.  The forward fuselage posed a bit of a dilemma due to the need to keep the window spacing even.  The front window can be filled and recut across the seam while using a single fuselage section, or a small sliver of fuselage can be patched in forward of the window.  I went with the latter.
Ju390_9B
All the cuts were squared up with a large flat file, carefully aligned, and joined with Testors Liquid Cement.  The liquid cement comes in handy for this kind of work, as the melting action serves to level and fill slight imperfections.  All the joints are across flat surfaces which makes things easy, the one exception is the underside of the fuselage aft of the wing.  The fuselage begins to draw together there, and sweeps up to the tail.  This area needed to be built back up a little with plastic card and putty.  Also note that the locating nubs on the engine nacelles have been removed.

Part II here: https://inchhighguy.wordpress.com/2019/04/26/junkers-ju-390-build-in-1-72-scale-part-ii/

Junkers Ju 390

I first became interested in the Ju 390 after reading about its history in William Green’s Warplanes of the Third Reich.  When Revell of Germany released their 1/72 scale Ju 290 kits, 390 conversions became an attractive, and affordable, possibility for modelers.  The Ju 390 was a development of Junkers’ previous Ju 290 series, which themselves were extensions of the Ju 90 design.  Green gives a detailed description of the modifications made to transform existing Ju 290 airframes to Ju 390 standard and lists the equipment they carried. 

References are an issue, there is just not that much material on the Ju 390.  Fortunately, most of the design details were consistent with the Ju 290s, and much of the operational history of the Ju 390 V2 parallels the 290s which were operated by the same units.  In addition to Green, Monogram Close-Up 3 Junkers 290 provides many pictures useful for modelers.

There are only seven known pictures of the V1, and just one purporting to be the V2.  I say purporting because the picture shows several obvious indications of tampering, and does not match the general description of the V2 given by Green.  There are three different versions of this picture on the Internet, all doctored in different ways.

If you want to model a Ju 390, there are several versions and paint schemes from which to choose:

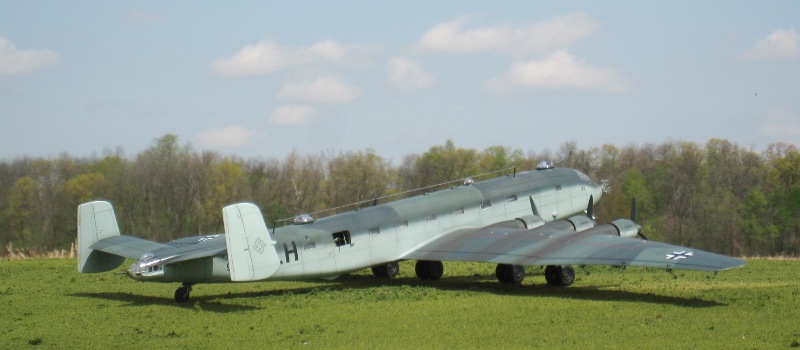
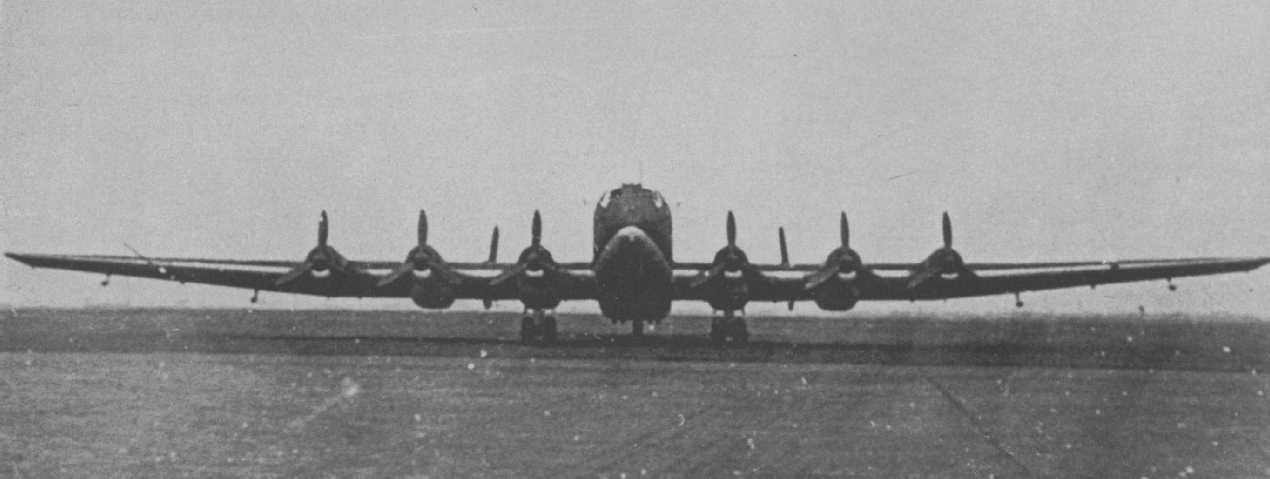
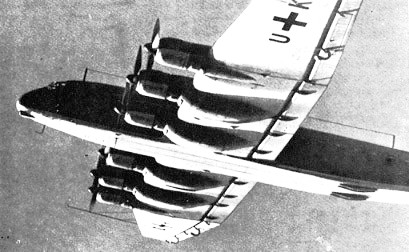
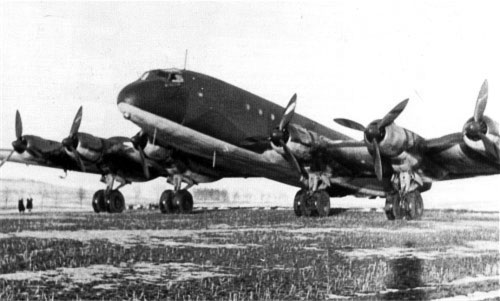
V1 (factory code GH + UK) – This was the development aircraft for the transport version.  Some sources state that a Ju 90 was used as the basic airframe for the conversion, and the fuselage had round cabin windows consistent with this. The fuselage aft of the wing was extended 8.07 feet, and the wings were extended 27.23 feet, bringing the total span to 165.02 feet, which is 27.5 inches (69.9 cm) in 1/72 scale!  For a transport, camouflage was the standard 70 / 71 over 65 scheme.  This aircraft appears to have spent its days conducting various tests and trials, including serving as an aerial tanker for Ju 290s.  It ended the war on an airfield in Czechoslovakia, without propellers.   Planet Models makes a resin kit of this aircraft, but it is very, very expensive.

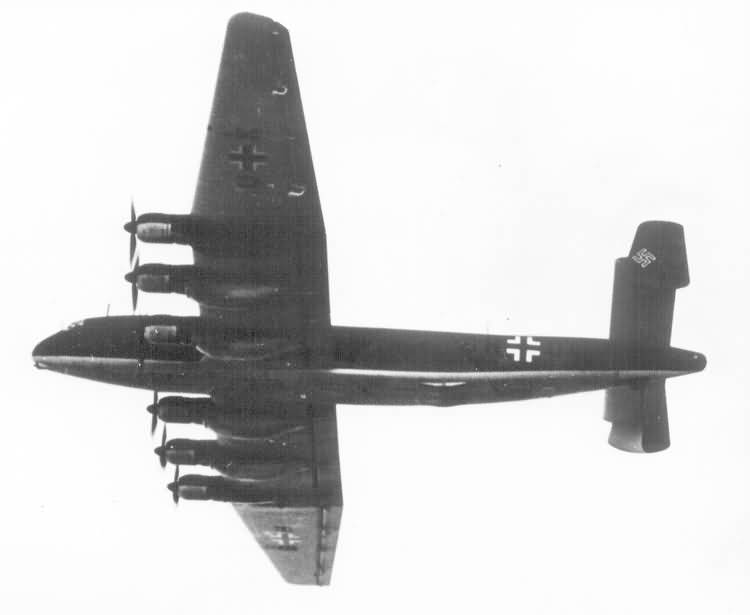
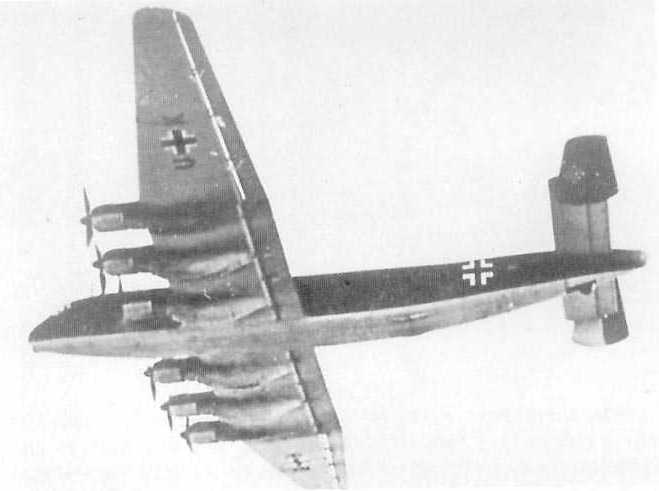
V2 (factory code RC + DA) – This was the development aircraft for the maritime reconnaissance version.  The main structure was modified the same as the V1, except an additional 8.2 foot section was added to the forward fuselage.  Various reconstructions show the fuselage with either round or rectangular windows – your choice.  This aircraft was fitted with a ventral gondola, FuG 200 radar, and full defensive armament.   It was completed in October of 1943, and delivered to FaG 5 (codes 9V + xx) at Mont de Marsan in France.  Several sources state that this aircraft flew to within 12 miles of New York in January 1944, although this is disputed by others.  Ju 290 maritime patrol aircraft carried a high-demarcation 72 / 73 over 65 scheme.

FaG 5 was disbanded in August 1944 when German airbases in France were threatened by the Allied advance.  FaG’s Ju 290s were passed to KG 200, a Luftwaffe special missions unit (KG 200’s assigned codes were A3 + xx, some aircraft were repainted to this, some to other codes).  Pictures show at least a few were given additional mottles of dark greens on the fuselage sides – see the cover photograph on the Monogram Close-Up.  Color photographs of the captured Ju 290 A-7 “Alles Kaputt” of KG 200 brought to Freeman Field by Col. Watson show it carried black undersides, while upper surfaces were RLM 83 Light Green with 81 Brown Violet spots.  So, there a few possible alternative camouflage and marking options to model the V2 in later service.

Several interesting missions are attributed to the Ju 390, including liaison flights to Japan.  While confirmation is lacking (not surprising for a special ops unit), Ju 290A-9s are known to have completed many of the same assignments.  The V2 was reported to be standing by at Recklin to evacuate Nazi VIPs to Spain in April of 1945.  While a Ju 290A-5 (W.Nr. 110178) actually made the flight to Spain, the V2 was not reported to have been located after the war.  One account says the V2 was flown to Norway, where it was repainted in Swedish colors, and then used to transport German scientists to a ranch in Paysandu Province, Uruguay.  The aircraft was then supposedly dismantled and sunk in the Rio Uruguay River, where it is said to remain to this day.  A mystery.

V3 – This was to be the Amerika Bomber Ju 390A development aircraft, but it was never built.  Dimensions were to have been the same as the V2, but defensive armament was to have been increased.  The bomb load was to have been carried externally.  Camouflage could be anything carried by German bombers during the last year of the war, so there are several interesting possibilities.

A Luft ’46 project is a proposed reconnaissance version with wings extended to 181.63 feet.  This was a Paperwaffe project only, and I’ve never even found general configuration drawings of this one.

Ki-390 – This one is definitely a Nippon ’46 “what if”.  Considerable interest in the Ju 390 design was expressed by the Imperial Japanese Army Air Force, the JAAF even purchasing manufacturing rights.  However, the design was never developed.  Anybody up for a kitbash using engine nacelles and armament from the Hasegawa Rita?  I’d be lying if I said I haven’t thought about it!

Ju390_01


Ju390_02


Ju390_03


Ju390_04


Ju390_05


Ju390_06


Ju390_07


Ju390V2


Model construction here: https://inchhighguy.wordpress.com/2019/04/25/junkers-ju-390-build-in-1-72-scale-part-i/