It is possible to build either of the two Ju 390s using two Revell of Germany Ju 290 kits. In this case I’ll be building the V2 maritime patrol aircraft. This conversion is fairly straight-forward, and is easier than it might first appear. There is obviously a bit of sawing to be done, but the parts generally mate back with others of identical lines and cross sections. Piece of cake, right? Revell has boxed A-5 and A-7 versions of the Ju 290, either kit can be used for conversions as the required solid nose is in both boxes. One benefit of using the A-7 version is there is an extra sprue with three Hs 293 anti-ship missiles for the spares box. These are nice kits, but there are a few inaccuracies which I’ll point out as I go along.
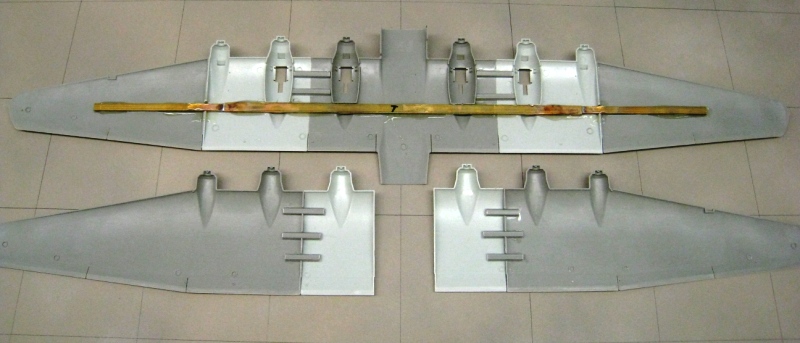
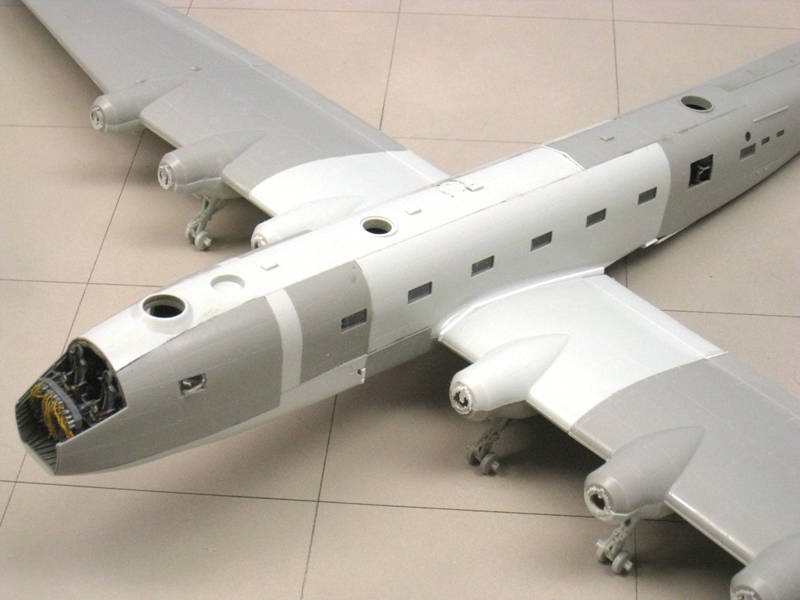
Like most aircraft models, construction began with the wings. Doesn’t everybody start with the wings? Well, I figured that if I was going to botch up this job, the wings were a likely place and I’d rather ruin the kits early so I could move on to something else. Fortunately, my kits were molded in two different shades of gray, which will make it easier to show where the parts were joined. Revell molds the lower wing and nacelles as part of the forward fuselage. Here is the wing stub removed from one kit (light gray), and the cut line marked on the second kit with masking tape. All the extra wingspan is added between the two nacelles which contain the landing gear on each wing. The distance should be 2.27 inches (57.6 mm) between engine centerlines when complete.Given the long span of the wings and the Frankensteinian nature of the surgery, strength was a concern from the very beginning. Here are the tops and bottoms of the extended wings, showing the added structure. The main spar was made from two sizes of hollow rectangular cross-section brass stock from the LHS, soldered together and epoxied in place. One of the kit sprues is flat, which turned out to be quite useful. These sprue sections were glued to the inner sides of each cut to reinforce the joints, and this also served to ensure the pieces were lined up flat. Any effort spent early on to get straight, even joints is well repaid with reduced sanding later!Here is a shot of the cockpit components. I was able to use several PE detail parts from a spare fret intended for an He 177 to dress up the side consoles and other bits. Both kit’s engineering stations were used, you can see into the compartment aft of the bulkhead through the open doorway. Revell provides three very comfy looking seats to go in this compartment, but they cannot be seen so they were left off. The instrument panel was scratchbuilt. The backs of the instruments and wiring were added, as these are easily visible through the canopy. The fuselage side components have been extended, more on this later. Interior detail is also visible through the waist gunners’ positions, so stringer detail was added here. The kit loading ramp is inaccurate, it is nothing like the pictures of the real thing. Fortunately, the inaccuracies are not apparent when the ramp is stowed. Stringer detail is added from 0.02 inch Evergreen stock. Note the seam placement where the cuts from the two kits come together. I was careful to make sure that none of the cuts lined up so there would not be a weak point in the fuselage. The floor joint is forward, the roof joint will be in the middle, and the fuselage sides are further back.If you look at interior pictures of Fw 200 maritime patrol aircraft, you see that the fuselage contained several fuel tanks. It made sense that the Ju 390 patroller would be similarly equipped, so I constructed eight tanks out of oak scrap. The fronts are elevated slightly on small blocks of plastic stock to give them the proper slant. The tanks were painted off-black, and given strapping of masking tape. The contrast between the tank and the tape is visible through the side windows. This gives an impression of depth and detail to the interior, and eliminates the see-through look.This is the interior of the aft fuselage, painted RLM 02 and given a black wash to bring out the stringer details. On the finished model the waist guns are deployed and the windows open, so the interior here can be seen by those with small flashlights and inquiring minds.The front office. Paint is RLM 66, given a wash of black and drybrushed with silver. Revell provides a decal for the instrument panel, which is unfortunately not visible in these pictures. I used the decals from both kits, split so there were six sets of engine instruments on the panel when finished. Some of the remaining instrument decals were used on the consoles. Throttles were made from sections of 1/700 PE ship railing. Instrument wiring and rudder pedal hydraulics are visible, and bits from the spares box provided some “equipment” lower down in the nose. The rear bulkhead was dressed up using more PE from the spare He 177 fret over plastic card.This is a shot of the underside of the cargo bay floor. I have reinforced the floor / fuselage joint with Evergreen strip, and backed up the joint where the two floor pieces meet with scrap card. This is probably overkill, but I didn’t want to take any chances given the size of the model and the number of cuts in the panels. A split seam would ruin the whole job.Major assembly is complete! It looks like a quilt, but most of the joints are quite smooth. All the cuts were measured to the lengths given in Green’s Warplanes of the Third Reich. The forward fuselage posed a bit of a dilemma due to the need to keep the window spacing even. The front window can be filled and recut across the seam while using a single fuselage section, or a small sliver of fuselage can be patched in forward of the window. I went with the latter.All the cuts were squared up with a large flat file, carefully aligned, and joined with Testors Liquid Cement. The liquid cement comes in handy for this kind of work, as the melting action serves to level and fill slight imperfections. All the joints are across flat surfaces which makes things easy, the one exception is the underside of the fuselage aft of the wing. The fuselage begins to draw together there, and sweeps up to the tail. This area needed to be built back up a little with plastic card and putty. Also note that the locating nubs on the engine nacelles have been removed.
WHENEVER ANY FORM OF GOVERNMENT BECOMES DESTRUCTIVE OF THESE ENDS (LIFE,LIBERTY,AND THE PURSUIT OF HAPPINESS) IT IS THE RIGHT OF THE PEOPLE TO ALTER OR ABOLISH IT, AND TO INSTITUTE A NEW GOVERNMENT― Thomas Jefferson


Man, that is a monster. The model is very impressive in person
LikeLiked by 1 person
I will enjoy this!
LikeLiked by 1 person