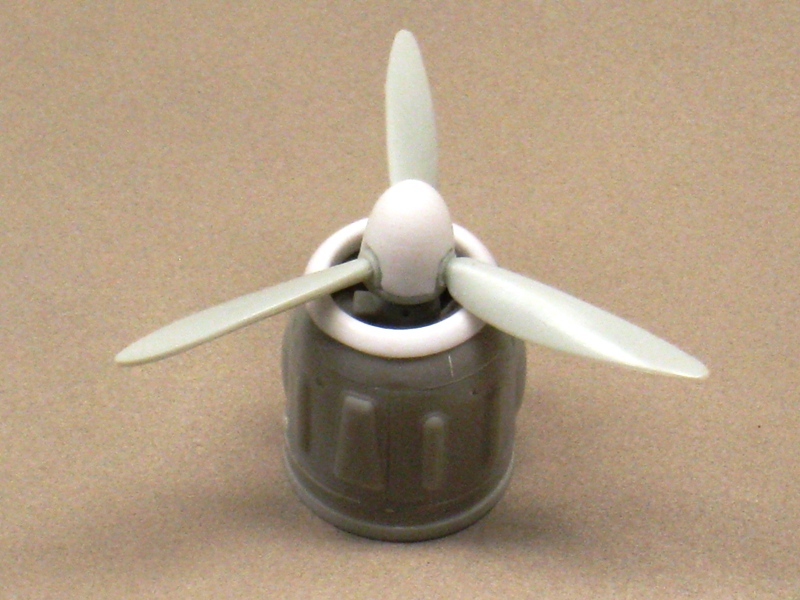
Here’s a look inside the tail gunner’s position. The thick kit seat and support was discarded, and a more delicate assembly fashioned from plastic stock, as was the “wooden” floorboard. The ammo box is a kit part, but it is one of the choices called out to be located inside the main fuselage. The tail gunner should have ammo too, so one of the boxes was placed here. The two smaller boxes on the bulkhead are scratch bits.The rear plate for the nacelles is a problem. The forward edge of this piece is stepped, which results in a trough about 2 mm wide which isn’t on the real aircraft. Also, while a few later Ju 290’s had exhaust stubs which were covered, the majority of photographs show aircraft with the exhaust stubs protruding from the rear of the cowling. Here is the kit part on the left, the modified part on the right has had the trough sawed off with a razersaw, and the inside whittled out with an Exacto knife, leaving just the ring.The kit propeller spinners look really undernourished. On the right is a replacement cast from an Fw 190 spinner. Also the tips of the prop blades have been filed down to make them pointier, to better represent what can be seen in photographs.One thing missing entirely is the armored ring on the front of the cowling. The front of each kit cowling was filed down and the opening enlarged until they would accept a casting of the armored ring, again copied from an Fw 190. This is a subtle fix, but I knew it would bother me knowing it was supposed to be there if I left it off.And here’s the finished product! A little extra work, but the nacelles look alot better, and the Quickboost exhausts add just the right amount of detail. I wound up building all eight nacelles from both kits, and mounting the six which looked best when complete.Out of the box, the kit canopy is covered with rather bulky framing which makes it very difficult to see anything inside. The framing is raised (really raised!), and is about twice as wide as it should be. I whittled away all the molded frames, and then filed and sanded the canopy until it was smooth again. A quick dip in Future (Klear) restored the shine and transparency. The glass area was then masked off and blended into the fuselage.After painting, the framing was restored using decal film. One thing I noticed late in the build was just how high the forward 20 mm gun position sat off the fuselage. If you compare this picture to the previous one, you can see how much material was filed down to lower the turret. The barbette was cut down a little more than half, this really improves the appearance of the model. Also, this is a good illustration of the delicacy of the PE FuG 200 radar antenna. These are from Aimes, part PE72001, and they are beautiful! They are also some of the more fiddly and delicate detail bits I’ve ever put on a model. One day I hope to have all the antennas lined up straight and square at the same time!The tail codes and Werknummer used on the model require some explanation, as there is no hard data as to what was actually carried. The Ju 390 V2 wore the factory codes RC + DA when built, but there is no direct evidence that it was ever repainted in FaG 5’s codes when delivered. I have presumed it was for this model, and applied FaG’s 9V squadron code and badge. The LH is a bit more speculative. In Luftwaffe Codes, Markings & Units 1939 – 1945, Rosch lists FaG 5 Ju 290 A-5s and A-7 as having the codes A9 + xH and A9 + xK. Since “L” was not taken, my Ju 390 became 9V + LH. Similarly, The Monogram Close-Up lists W. Nr. 0181 as the first Ju 290 A7, and W. Nr. 0186 as the second, with 0182 – 0185 unused. 0182 became the W. Nr. for my model. Pure guesswork. All these codes are obtainable using the Revell A-7 kit decal sheets. The grouping of the codes at the rear of the fuselage is accurate, but the more I look at it the more I wish I would have chosen to duplicate another option seen in photographs and spread the codes out more along the fuselage. It’s not necessarily wrong this way, but on my next Ju 390 I’ll do it differently.
The camouflage pattern is an extrapolation of the RLM design for Ju 290 maritime patrol aircraft. Since the 390 is a stretched 290, I simply stretched the areas covered by the splinters, while keeping the pattern pretty much the same. Happily, the demarcation of the camo scheme intersects the line of windows along the fuselage, which make painting much easier.
WHENEVER ANY FORM OF GOVERNMENT BECOMES DESTRUCTIVE OF THESE ENDS (LIFE,LIBERTY,AND THE PURSUIT OF HAPPINESS) IT IS THE RIGHT OF THE PEOPLE TO ALTER OR ABOLISH IT, AND TO INSTITUTE A NEW GOVERNMENT― Thomas Jefferson