A short but excellent series of original color photographs featuring a Supermarine Spitfire Vb of No. 40 Squadron, South African Air Force. These were taken in March 1943 while the squadron was operating from Gabe, Tunisia. All feature WRD serial ER622. No. 40 Squadron had just converted from the Hawker Hurricane in February, so these Spitfires had been in service for approximately one month. Enjoy!
A beautiful aerial shot of WRD with WRC in the background.A crop of the previous photo to show detail.A similar perspective with the wingman in the distance. (IWM)ER622 on the ground.Interesting details of the pilots’ flight gear. Note the SAAF orange in place of the RAF red on the fin flash and roundel, as well as the gear down indicator on the wing.
A series of in-flight colour photographs of Spitfire Vbs of No 417 Squadron Royal Canadian Air Force over the Tunisian desert photographed in April, 1943.A broader view of the previous photo. No 417 was known as the ‘City of Windsor” Squadron.417 Squadron Spitfires warming up. The airfield was located along the coast near Ben Gardane, Tunisia, near the border with Libya.Spitfires either being repaired or stripped for parts. Some interesting details for diorama inspiration. (IWM)A fine study of desert pilot attire. Note the exhaust staining on the fuselage. (IWM)Flight Lieutenant W. H. Pentland is helped into his harness by ground crew. He was latter assigned to No 440 Squadron flying Typhoons over Europe. He was killed by flak on 07OCT44 while attacking a train.Officers studying a map on the tailgate of a truck.Lunch is served on the veranda. Note the variety of uniform items.
A Macchi MC.200 Saetta makes an extremely low pass over Grottaglie Airfield, Puglia, Italy. Most date this photograph on 08SEP43, a few days after the Italian surrender. The airfield was under Allied control at the time as evidenced by the Spitfire in the foreground. Many fully operational Italian aircraft types were found intact when the airfield was occupied, the Macchi may well have been flown by an over-zealous Allied pilot on a test flight.
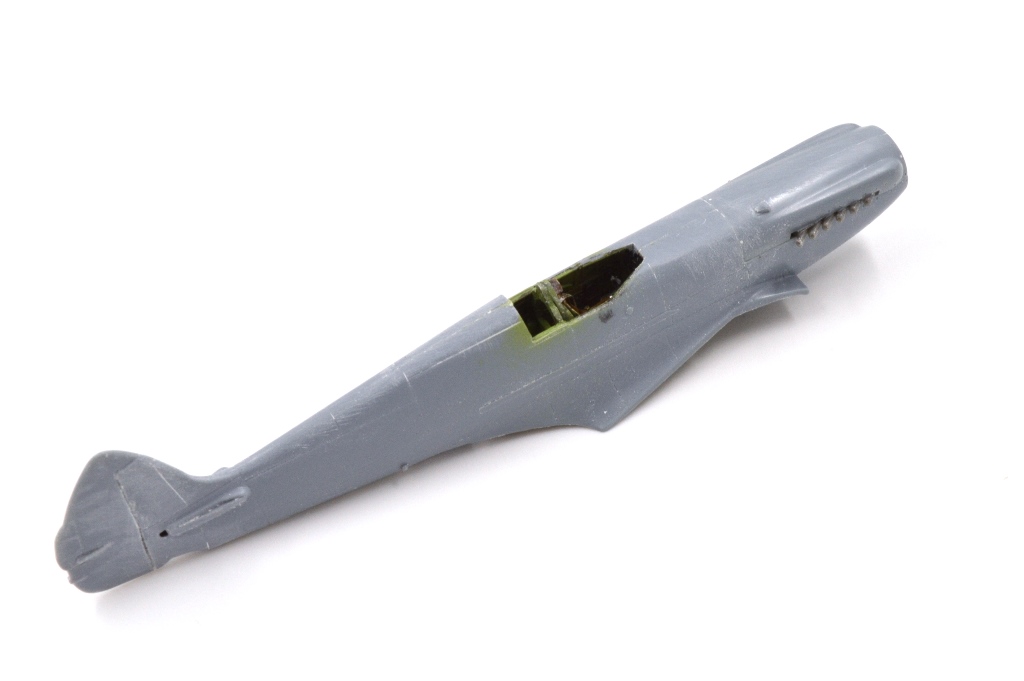
For the last finished model post of 2023, a bit of whimsy. This Spitfire was cobbled together from spare parts and a little scratchbuilding. The main fuselage and wing components are from the Sword Seafire five-kit boxing, the remaining parts are left-overs from Eduard and Airfix Spitfires, any bits still missing were scratchbuilt. Decals are also from the spares box, with the exceptions of the code letters which are from the Xtradecal sheet. Wing Commanders were permitted to use their own initials as code letters on their personal aircraft, so I had a little fun with that and substituted my own initials.
One of the Seafires with the main round of sanding in the (sanding) dusts of history, ready for priming. Canopies were masked the traditional way with Tamiya tape, I find it hard to justify the prices of some mask sets for simple canopies. The bottom edges of the clear parts were blackened with a Sharpie, and the canopies fixed in place with superglue.This is the underside of the spare parts Spitfire. Horizontal tails, cannon, exhausts, and landing gear are Eduard parts. The underside of the nose and smaller cooler are from Airfix. White parts are scratched from Evergreen stock.As usual for my builds, I primed everything with Mr. Surfacer 1000 to check for flaws. With the prolonged sanding process it was no surprise to find several areas which needed more work. Perfect Plastic Putty helps with the canopy seams. After the sanding and restoration of panel lines, I hit the models with another shot of Mr. Surfacer to check again.Once everything has been smoothed out it’s time to proceed to the painting stage. Yay! I like the painting stage. I have masked off the hard color separation on the undersides with Tamiya tape, and laid out the camouflage pattern with poster putty. If you look closely at the starboard wing you can see where a circular mask is in place to represent a roundel which has been painted over.Two of the Seafires were painted in the post-war scheme of Extra Dark Sea Gray over Sky. The Gray tended to take on a blue hue which the Mr. Color shade lacked, so I mixed it with USN Intermediate Blue.The Temperate Sea Scheme consisted of Dark Slate Gray and Extra Dark Sea Gray over Sky. The Dark Slate Gray is another mix, this time with Olive Drab. A darker mix was applied to the starboard wing to represent fresh paint for a painted-out roundel.The Sword decal sheet is printed by Techmod, so there were no issues with the quality of the markings. I used the kit decals on four of the five Seafires. This is the exception, these markings are from Xtradecal’s Seafire sheet 72135.I had some fun with the markings on the spare parts Spitfire. The decals on this one are from the spares box like the rest of the components, and most of those are from Eduard. RAF Wing Commanders were allowed to use their initials as the letter codes for their aircraft, so I sourced my own initials from Xtradecals RAF Sky Code Letters sheet 72189.Most of the smaller parts had already been glued in place before the models received a panel line wash and flat coat. I have been putting more and more parts in place before painting whenever possible to ensure a strong bond. It’s a balance between ease of painting and the risk of breaking off parts.And here’s the finished batch! You have to love the lines of the Spitfire, and the navalized versions lose none of the appeal in my book. The Sword kits take a lot of extra time to finish due to the disproportionate amount of parts clean-up required and fit issues. If you enjoy sanding and are good at filling seams they can be whipped into shape, but Tamagawa kits they are not. They are some extra work to finish but I like the way they turned out.
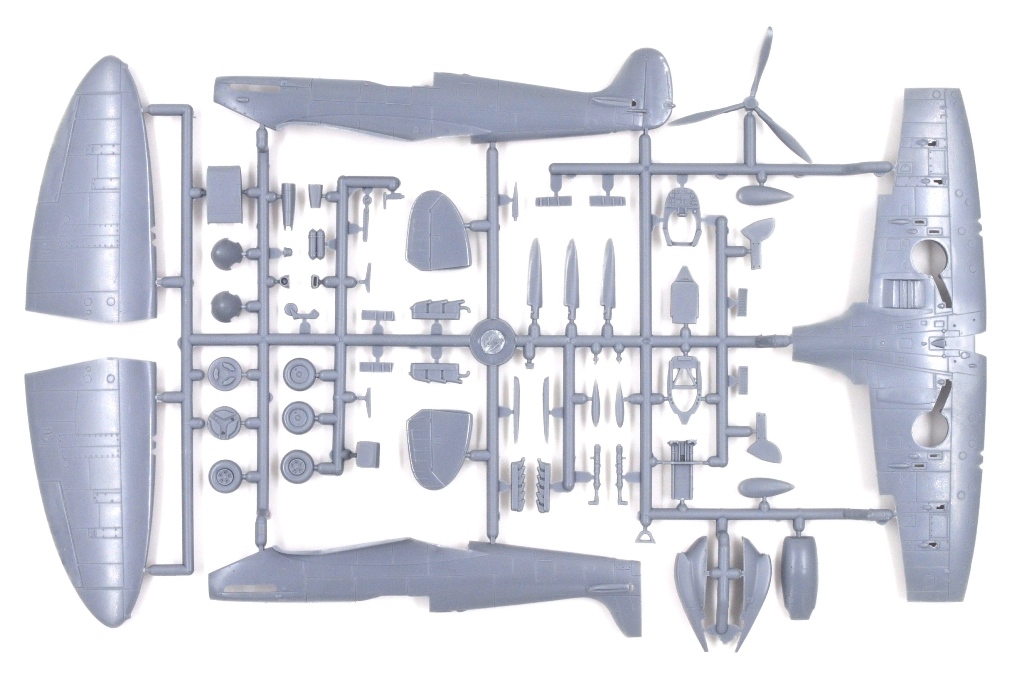
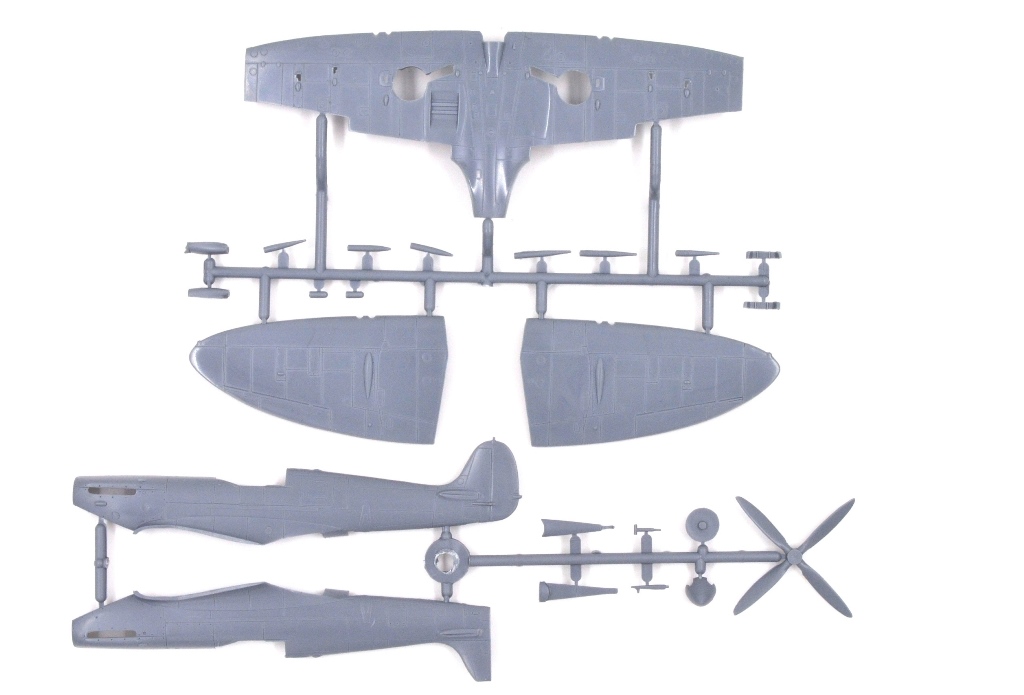
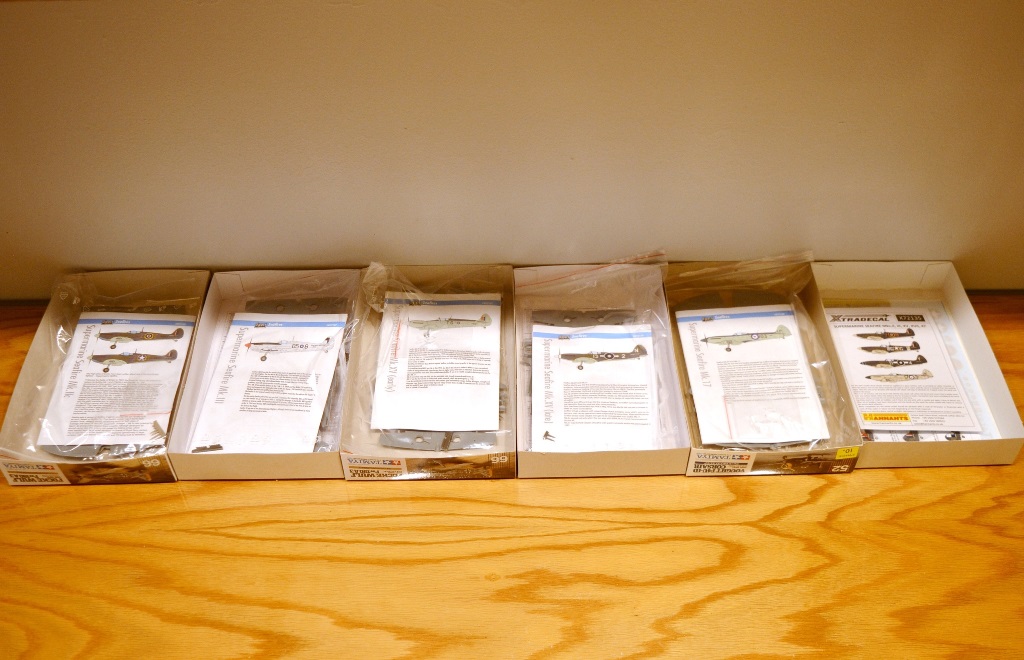
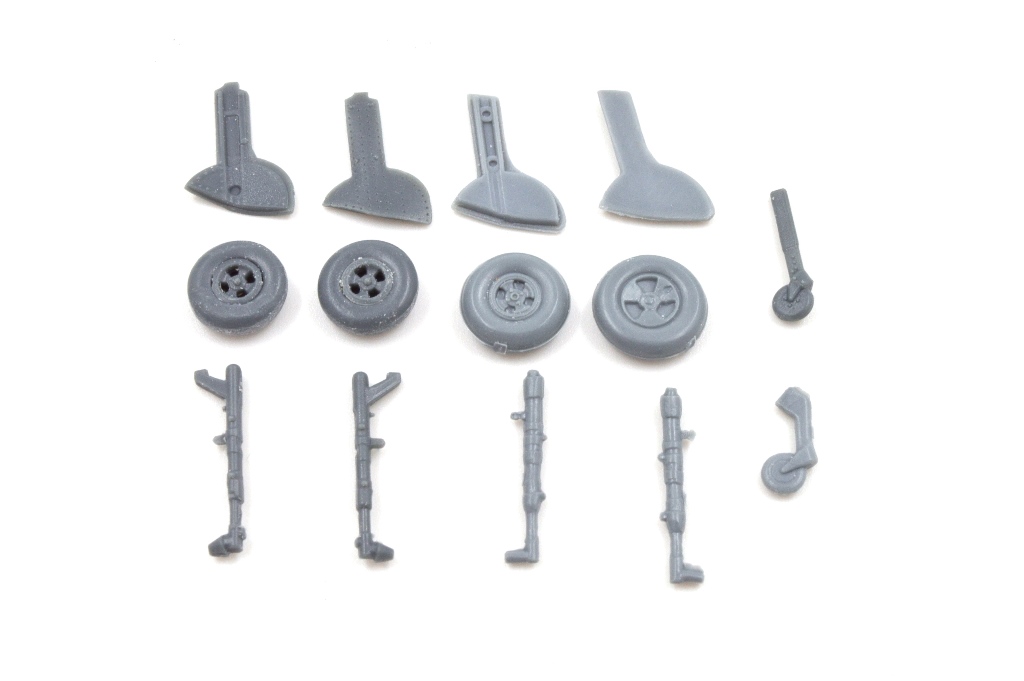
Sword has packaged their Seafire line together, a total of five kits in one box. The kits were originally issued in 2011 – 2012, with this one you get a “batch in a box”, a good place to start if you want to build a series of Seafires.Inside the individual kits are each packaged in their own zip-lock bags. These are limited-run tools with no locating pins and a prominent mold seam which will have to be eliminated from each part. Plastic is soft. As you can see, there are parts provided for a variety of options. This sprue is common with Sword’s Spitfire, including the main fuselage & wing components, so modelers with the right decals could also make standard Spitfire marks from this boxing if desired.The Seafire-specific parts are provided on supplementary sprues for each mark. This accounts for the many subtle detail changes for the Seafire, and will leave several Spitfire components for the spares box when done.I’m often asked how I keep things organized during a batch build, so here’s a shot of the bench at the beginning of the build. I always start with a clean bench. I save spare top-opening boxes to use as trays, and each box has the parts and instructions for each subject. The spare box on the right holds any aftermarket and is used to collect unused parts until the build is over. The subjects are arranged chronologically, with the earlier versions to the left.I was intrigued by the extra Spitfire components Sword provides in these kits, which included several fuselages and a complete set of wings, among several smaller components. I already have left over parts from both Airfix and Eduard Spitfires from previous builds, so I decided to see if it would be possible to cobble together an extra Spitfire from the spares. Here is a photo of the Sword cockpit on top, the surplus Spitfire on the bottom with a mix of parts from the spares box and a little scratchbuilding.A painted cockpit ready to close up, with a set of Eduard PE belts added.Sometimes it is easier to sand subassemblies separately, and this is the case with the fuselages on this build. I generally don’t enjoy sanding, and the Sword kits require the removal of mold seams, test fitting, and sanding for each component.Fit of the wings left a lot to be desired and will require some extra effort to smooth out. Assembly was a low point for this batch, and it required considerably more time than usual to get past the sanding stage. This view provides a good look at the resin exhausts though, which are well detailed and sharply cast.Since I was already raiding the spares box here is a comparison of the Eduard landing gear components with those from Sword. The Eduard parts are the darker plastic, they are better detailed and require little clean up. They are also slightly smaller. I used the Eduard parts where I could, partially due to sanding fatigue.I needed another canopy for the extra Spitfire, and there were none left in the spares box or any of the Falcon sets I had on hand. I plunge molded one using a Sword canopy as a master, here is the set up ready to take the plunge.
Seafire Ib NX942 of 736 Naval Air Squadron is seen in the background as Sub-Lieutenant Harold Salisbury adjusts his flight helmet for the camera. The photograph was taken at Royal Navy Air Station Yeovilton in September 1943. Complete fuselage codes are “AC-E”.Ratings are seen fueling Seafire X4652 at Yeovilton, September 1943. Agricultural tractors were often used as towing vehicles. Yeovilton is currently the home of the Fleet Air Arm Museum.A Seafire in the foreground at HMS Fledgling. Also visible are a Corsair, a Martlet, and two Barracuda. Poking out of the hangers are two Sea Hurricanes and a Hellcat.A crop of the previous photo shows the wear on the paint at this Seafire’s wingroot. HMS Fledgling was the Royal Navy’s aircraft maintenance school. In April 1943 it was decided to use the facility to train WRENs as aircraft mechanics in order to release more men for front-line service.Here is a series of outstanding color photographs taken aboard HMS Indomitable at Scapa Flow in March 1943. Indomitable was working up following the repair of bomb damage suffered during Operation Pedestal, the famous convoy to Malta. In the background is the Avenger-class escort carrier HMS Biter (D97).A crop from the previous photo focusing on Seafire Mk IIc MB189 of 880 NAS. The aircraft are being spotted on Indomitable’s flight deck. Note the plane handlers have placed their chocks on the Seafire’s wings.A fuel lighter passes down the side of Indomitable with Seafires of 889 NAS on deck. While U.S. Navy aircraft carriers were built with wooden flight decks during WWII, those of the Royal Navy were armored.A magnificent view of the Indomitable’s camouflaged island structure behind two Seafires.A Reserve Flight Lieutenant poses on the wing of his Seafire. Modelers note the amount of wear to the paint on the leading edge of the wing. This photograph has sparked discussion concerning the color of the underside of the nose and removal of the tropical Vokes air filter.Three unidentified pilots with their flight gear donned over their dress blue uniforms, which seems a rather impractical outfit for flying. On the left is a Sub-Lieutenant of the Royal Naval Volunteer Reserve (Aviation), on the right is a Sub-Lieutenant of the Royal Naval Reserve.
Here are more photographs of American Spitfire Mark XI from the 7th Photographic Reconnaissance Group, 14th Photographic Reconnaissance Squadron at Mount Farm, Oxfordshire, England in 1944. MB 946 has an impressive mission tally. The lighter hue of the PRU Blue on the fuselage where the upper portion of the invasion stripes have been removed is worth noting.Ground crew are used as human sandbags to keep the tail down as the engine of this Spitfire is run up. The concrete disk visible in the foreground is an anchor used to tie down the wings of the aircraft.A beautiful view of “My Darling Dorothy”, PA892. Wheel hubs were finished in either the PRU Blue or natural Aluminum, as seen here.Another view of “My Darling Dorothy”. An unusual feature is that it appears the outline of the U.S. national insignia has been overpainted in PRU Blue instead of the prescribed Insignia Blue.Diorama bait as the Spitfires are being refueled. Note the row of bicycles to the right.“Marcella” warming her engine prior to take-off.Another view of “Marcella” heading towards the runway. In the background is a Cletrac M2 towing tractor.MB950 showing several touch-ups to her PRU Blue finish. Her wheel hubs are also PRU Blue, the white stripes are there to indicate if the tire has slipped on the wheel.
All photographs credit Imperial War Museum, Freeman collection, Robert Astrella photographer
The USAAF 7th Photographic Reconnaissance Group operated the Spitfire Mark XI from Mount Farm, Oxfordshire, England. The Mark XI was a Mark IX airframe with all armament and armor removed and extra fuel and cameras added, optimized for high-altitude flight. This is PA944 with invasion stripes under the fuselage. (All photographs credit Imperial War Museum, Freeman collection, Robert Astrella photographer)Another view of PA944 showing the wear and weathering of her PRU Blue paint scheme. Note the serial on her fuselage repeated on the vertical tail. Here is an interview with the pilot of PA944, John Blyth. Well worth watching here: https://www.youtube.com/watch?v=ie3SrjLlcUY&t=1s&ab_channel=DAvenport3-2614Not all the Spitfires were finished in the PRU Blue. Here is MB946 in an overall natural metal finish with a Dark Red stripe under the exhausts and black rudder.Not all the Spitfires were finished in the PRU Blue. Here is MB946 in an overall natural metal finish with a Dark Red stripe under the exhausts and black rudder.A close-up of PA842 shows the same finish as MB946 above.A fine study of MB950 in overall PRU Blue before her serials were repeated on the tail. PRU Blue is generally represented by modelers as approximately FS 35164 or FS 35189.MB950 from another angle. The PRU Blue degraded quickly, and this aircraft shows several areas where the paint has been re-touched. A later view of MB950, showing the Dark Red under the exhausts and Olive Drab rudder. By this time her serials have been applied to the tail. Note the prominent exhaust staining. The Spitfire Mk. XI on display at the NMUSAF is serialed as MB950, although her markings do not match either version in these photographs.Here are two PR Mark V “War Weary” aircraft used as hacks, EN904 and AR404. Worn-out aircraft were declared War Weary when they had exceeded their airframe life and/or suffered damage which precluded them from being pushed to their original design limits safely.Another view of AR404 which reveals several details useful for modelers and a surprise – an RAF roundel on her upper starboard wing. This emphasizes the value of multiple views of the same subject, one can only speculate which insignia are on the other wing surfaces.
2021 saw a return to some degree of normalcy, but as with any great disruption there have been some re-definitions of just what that means. There was a return to live in-person shows which was sorely missed. What has changed with the shows is now they are bigger and better attended, with more vendors, more model entries, and an overall increase in quality of the builds. Fewer group activities have translated into additional modeling time for many people, and for socially introverted types this appears to have been a good thing. It has certainly resulted in more and better models on display at the shows!
The display area of the 2021 Military Modeler’s Club of Louisville IPMS show.
I was able to go to three shows this year, Indianapolis, Louisville, and Cincinnati. All three were held in new venues, and all three were very successful and saw half again as many entries above what was normal for the club, if not more. Many inspiring and innovative builds, and fellow modelers are always happy to share new techniques and tips to try out. The guys at Plastic Model Mojo have taken their show on the road, and I was able to sit down with them and catch up in person, in addition to listening to their podcasts while I model. Plastic Model Mojo here: https://www.plasticmodelmojo.com/
Mojovians Dave and Mike in front of an Fw 190 replica at the Cincinnati IPMS show at the Tri-State Warbird Museum.
For bibliophiles the news is still not good. Publication dates on many new books have slipped. The secondary and overstock markets have fared little better, with fewer selections and higher prices all around. After two years the Half Price Books traveling blow-out sale is still nowhere on the horizon, and I’m starting to wonder if it will ever return. Hopefully soon!
Blog Statistics and News
The Inch High Guy blog has completed year three! A big thanks to all who visit on a regular basis, whether new or old. I am happy to report that I again managed to make a post each day, although there were a couple of near misses. The blog received 139,675 views and 55,483 visitors, up from 73,992 views and 26,731 visitors last year. The most popular post again this year was “Boeing B-17 Flying Fortress Interior Colors Part I” with 3,267 views:
Guess what? If you can see the ribbing on interior of a Fortress it should be Natural Aluminum, with only rare exceptions. Interior Green is for Warbirds!
Models Built in 2021
34 completions, 24 aircraft and 10 vehicles. In addition I painted 42 figures, 14 horses, and constructed 8 diorama / vignette bases. Everything was built to 1/72 scale as is my preference. The mosaic has a picture of each build, construction posts and additional finished pictures can be found by searching the blog.
Arma Hobby FM-2 Wildcat x 3
Azur Martin B-10
Trumpeter T-55
Takom MAZ-537 Tank Transporter
Airfix Spitfire Vc x 4
Vickers Mk. VI light tank resin print
Cunningham T1 light tank resin print x 2
Brengun Yak-1
Arma Hobby Yak-1b x 3
Hasegawa Yak-3
Dakoplast Yak-7 x 2
Valom Yak-7
Emher Yak-9
Hasegawa Fw 190D (old tool)
Hasegawa Fw 190D
Tamiya Fw 190D
Dragon Messerschmitt P.1011 x2
Dragon Julia
Revell Fw Fitzer
Revell Ho 229 (repaint)
First to Fight Polish TKS Tankette
ICM Sd.Kfz. 222
First to Fight Sd.Kfz. 247
Dragon Krupp Protze Kfz. 70
Italeri sK 18 10.5 cm Field Gun
What’s Ahead in 2022
This has been a year of exciting announcements for 1/72 scale modelers. The new Focke Wulf Fw 190D series from ICB looks spectacular, and it even includes an accurate wheelwell for the first time in the scale. The family will cover all the Dora subtypes. Flyhawk released a new tool SBD Dauntless which will fix the dive brake issues with Hasegawa’s kit, and will hopefully continue to be available – something which can’t be said for several Hasegawa kits. To top it off ICM and Special Hobby have both just announced a new-tool Ki-21 “Sally” for late 2022, a subject which has long been on the list of several modelers. The Sally was strangely missing from Hasegawa’s new-ish series of Japanese twins, modelers who had to have one searched for the MPM or 1976 Revell kits.
The big news for many modelers is that Arma is now shipping their P-51B/C kits. The previous attempts from Academy and Hasegawa both suffered from fatal, difficult to correct shape issues. Finally, for the first time, an accurate P-51B/C is on the way! This kit should prove to be a license to print money for Arma, here’s hoping it is a windfall for them! I have long agitated for this subject, so to put my money where my mouth is I have placed an order through my Local Hobby Store (support your LCS!) for one. Case. For starters.
Now Arma, if you’re listening, we could sure use an accurate Ki-43-II Hayabusa “Oscar” in 1/72 scale.
Arma’s P-51B/C
The second big release (for me) has a much more personal connection. Takom has announced a U.S. Navy 16”/50 caliber triple turret in 1/72 scale, packaged as Turret One from USS Missouri (BB 63). This kit has parts for the rangefinder which was later removed from the first turrets, but with a few modifications could represent any of the main battery turrets on the Iowa class battleships. Now for the connection part – I served in the Navy, Missouri was my ship, Turret One was my turret. 1/72 scale Missouri’s in both the WWII and 1980’s configurations are on my bucket list, and this kit makes that project one step closer. If the appropriate 5”/38 Mark 28 mount is ever kitted that would cinch the deal (the 1/72 scale 5”/38 Mark 38 mount included in Takom’s 1/700 Gearing class kit has an unarmored gun house, appropriate for destroyers but not battleships).
Takom’s 16″/50 turret
Lastly, we have purchased a wooded plot of land along the scenic White River, where we intend to build an energy efficient (net zero) home. This is obviously a time-consuming project, and will inevitably impact time available for modeling and blogging. In fact, the effects have already begun to be felt as I have been busy on the property cutting down the invasive Asian Bush Honeysuckle which is crowding out the native trees. Hopefully there will still be opportunities for modeling, but the pace may slow a bit. If I miss the daily posting on the blog in the coming months this will likely be the reason.
The mighty White River
May you each live long enough to build every model in your stash!
WHENEVER ANY FORM OF GOVERNMENT BECOMES DESTRUCTIVE OF THESE ENDS (LIFE,LIBERTY,AND THE PURSUIT OF HAPPINESS) IT IS THE RIGHT OF THE PEOPLE TO ALTER OR ABOLISH IT, AND TO INSTITUTE A NEW GOVERNMENT― Thomas Jefferson